TABLE OF CONTENTS
What goes into making a motherboard, anyway? It’s the backbone of any PC and influences your final user experience, but there’s very little information about what they’re made of or how they’re manufactured.
So… let’s break it down and dig into the “what” and “how” of motherboard technology.
What are Motherboards Made of in Raw Materials?
So, let’s start with raw materials. A motherboard’s PCB (Printed Circuit Board) is largely composed of fiberglass and copper.
A printed circuit board is pretty much exactly what it sounds like, and yes, that means that the bulk of your electronics is being “printed”— albeit with materials MUCH different from paper or ink.
Well, that’s pretty much how any modern piece of consumer electronics is made.
Of course, this is an oversimplification because there’s a lot more nuance to it than that. For example, what components actually make up the rest of the motherboard, and in what order are all these pieces manufactured and put together?
Let’s dive into these questions!
What Components Make Up a Motherboard?

Image Credit: GamersNexus’ Gigabyte Motherboard/GPU Factory Tour.
The image above is taken from a tour of Gigabyte’s motherboard and GPU manufacturing plant.
This graphic is set above a workstation where people manually test each listed component on the motherboards, ensuring everything works correctly before the motherboard is even boxed and shipped.
Below, I’ll list the core components of a consumer motherboard along with a brief explanation of each (Only a few key ones you should know).
Rear I/O
The part where all the ports are for your USB devices, mouse and keyboard, and general peripherals. Depending on your motherboard specs and onboard hardware, both the type and number of ports here can vary quite a bit.
For example, some motherboards may have additional or newer USB ports, while others might feature antennae for Wi-Fi and Bluetooth.
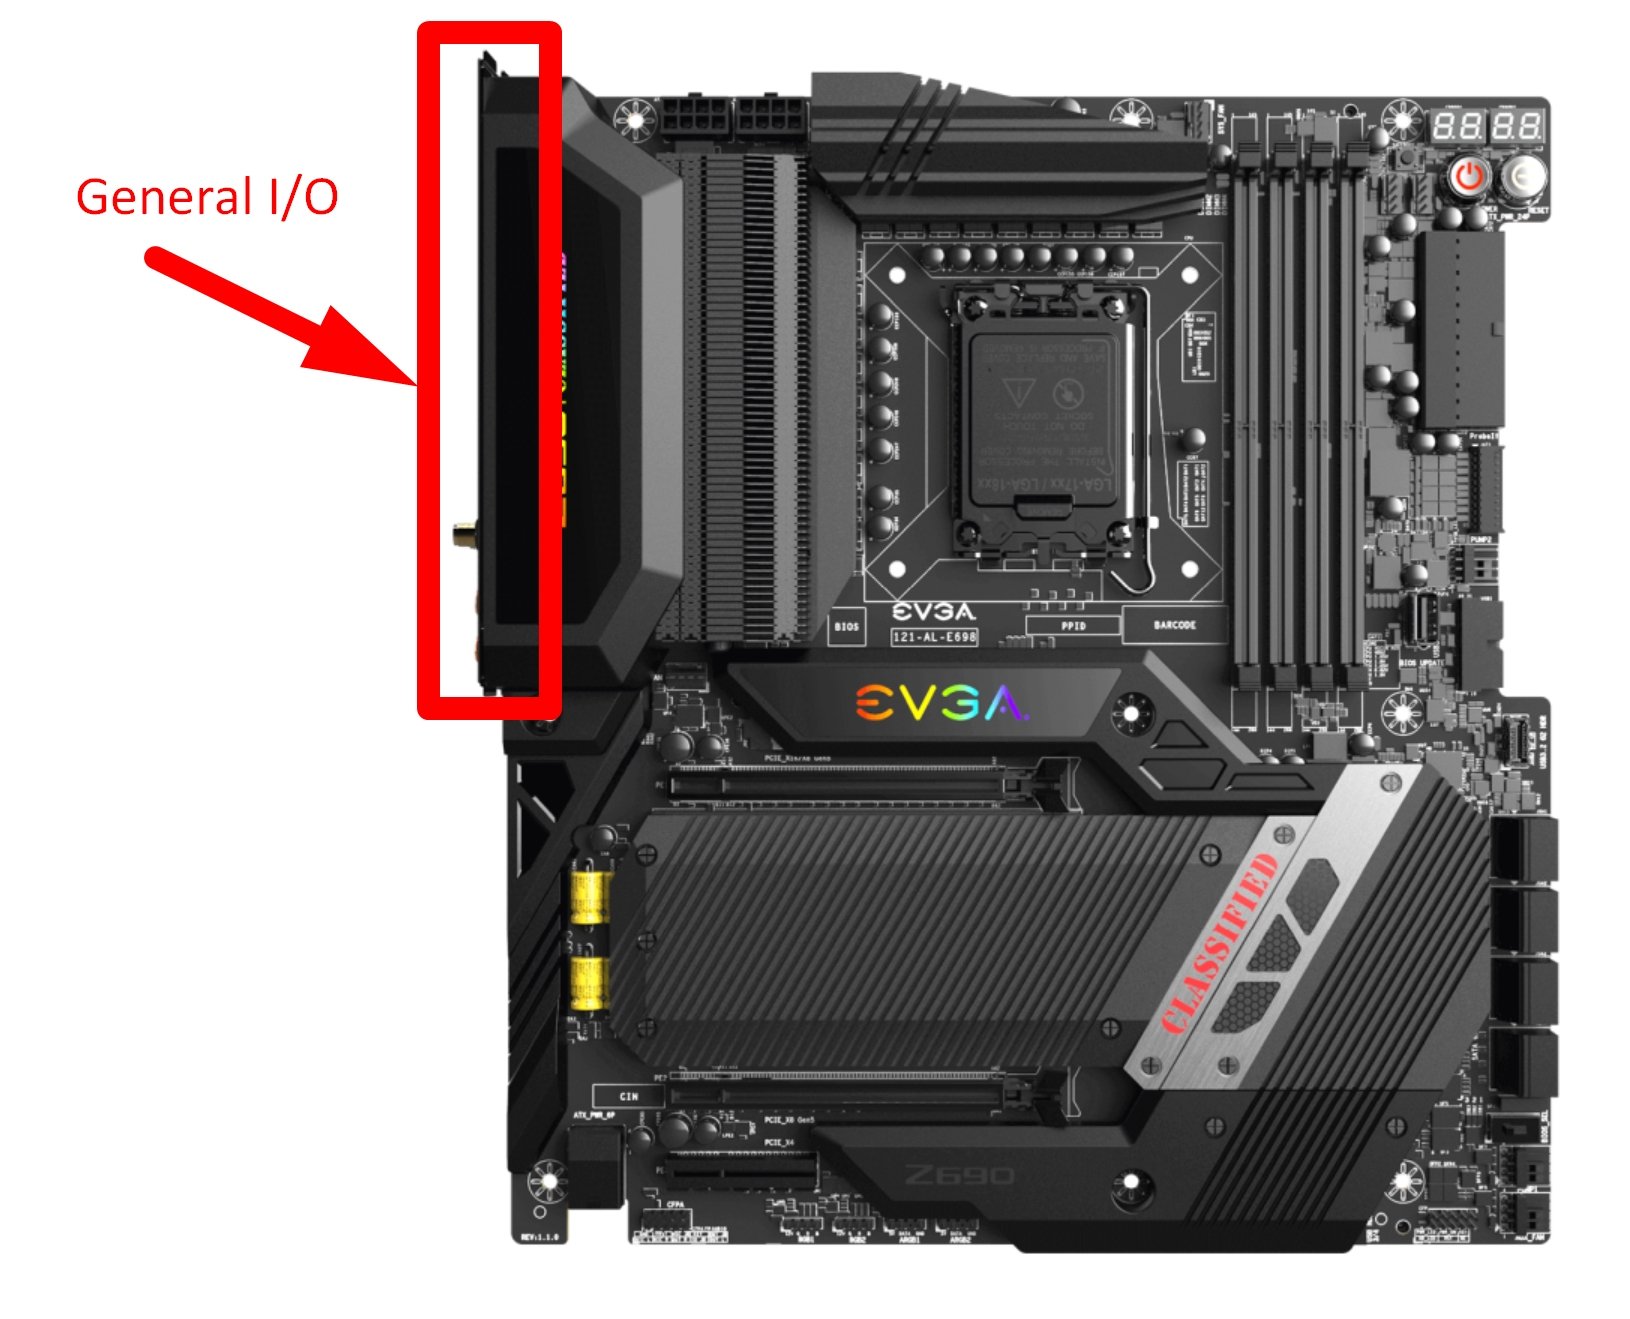
Motherboard Rear IO
EEPROM (Electrically Erasable Programmable Read Only Memory)
An EEPROM chip houses a motherboard’s basic low-level firmware, which includes your BIOS/UEFI. However, this chip only stores the default BIOS setting values.
Any adjustments that you make to your BIOS settings aren’t stored here. That’s where the next component helps.
CMOS Flash and CMOS Battery
The CMOS battery was designed to supply power to your computer’s Real-Time Clock (RTC) and the volatile CMOS RAM on the motherboard (this is where your custom BIOS settings are stored) even when you turn your computer ‘off.’ This is why removing the CMOS battery resets your BIOS config — making it a pretty standard troubleshooting step for any PC/laptop.
That said, today, we have nearly moved on from the era of volatile memory to NVRAM (Non-Volatile Random Access Memory).
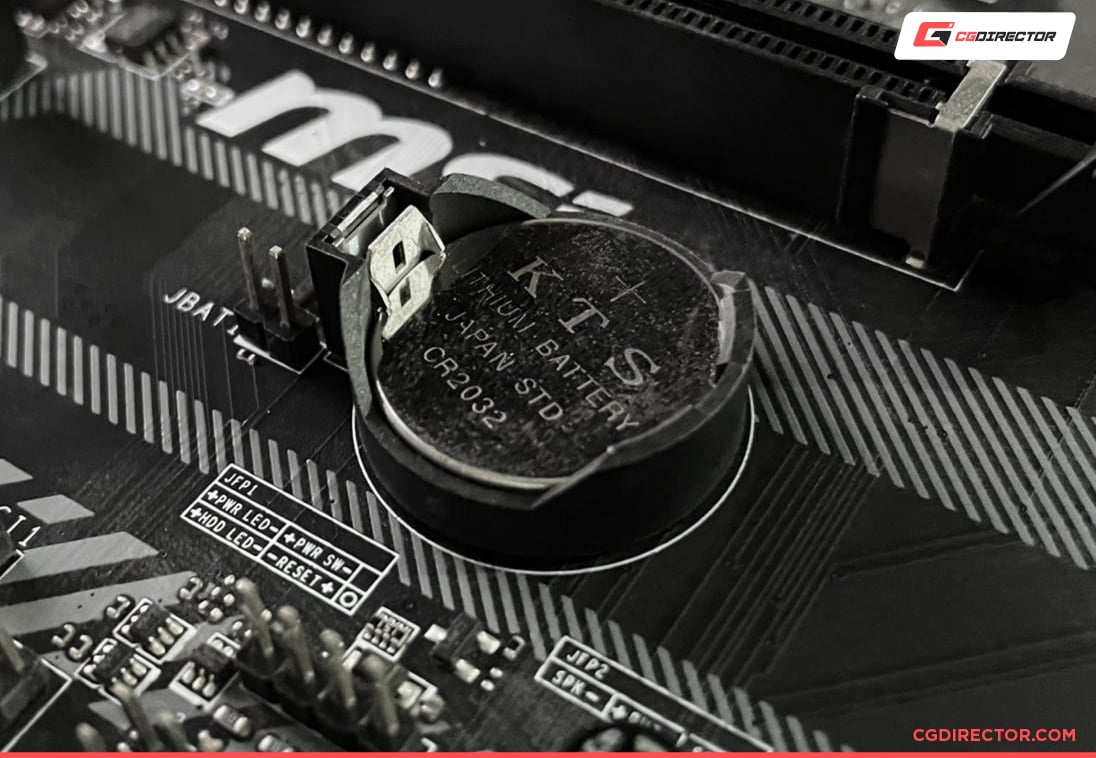
You’ll find this battery in an accessible place on the motherboard so it can be removed to hard-reset the BIOS after the motherboard has completely powered off and disconnected from all power sources.
CPU Socket
Holds the CPU. Until Socket AM5, AMD’s CPU sockets have been PGA (Pin Grid Array) for a Field of Pins on the bottom of the CPU.
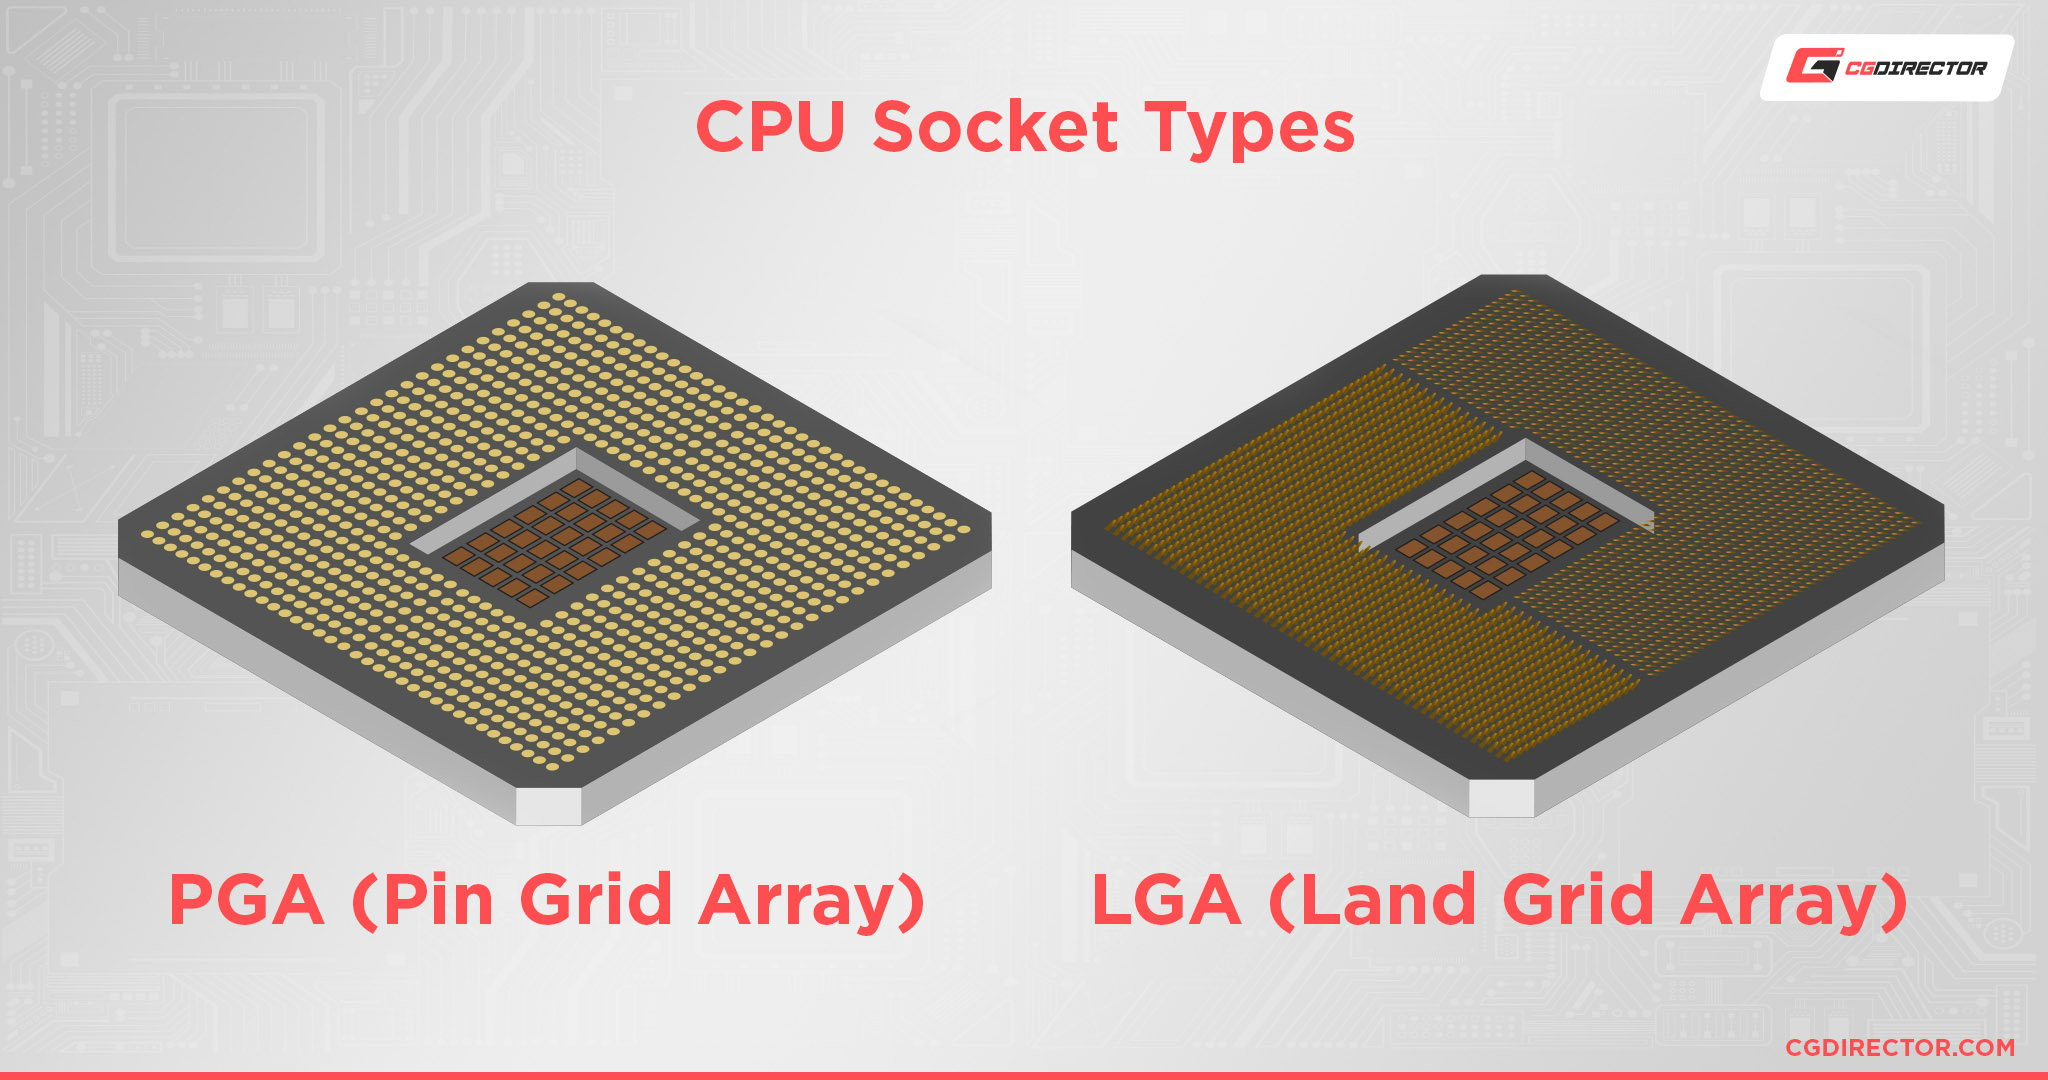
Intel’s modern sockets, and now AMD’s new sockets, instead feature LGA or “Landing Grid Arrays,” which means the pins are now on the motherboard instead of the CPU. Harder to damage with proper installation, sure, but also harder to repair.
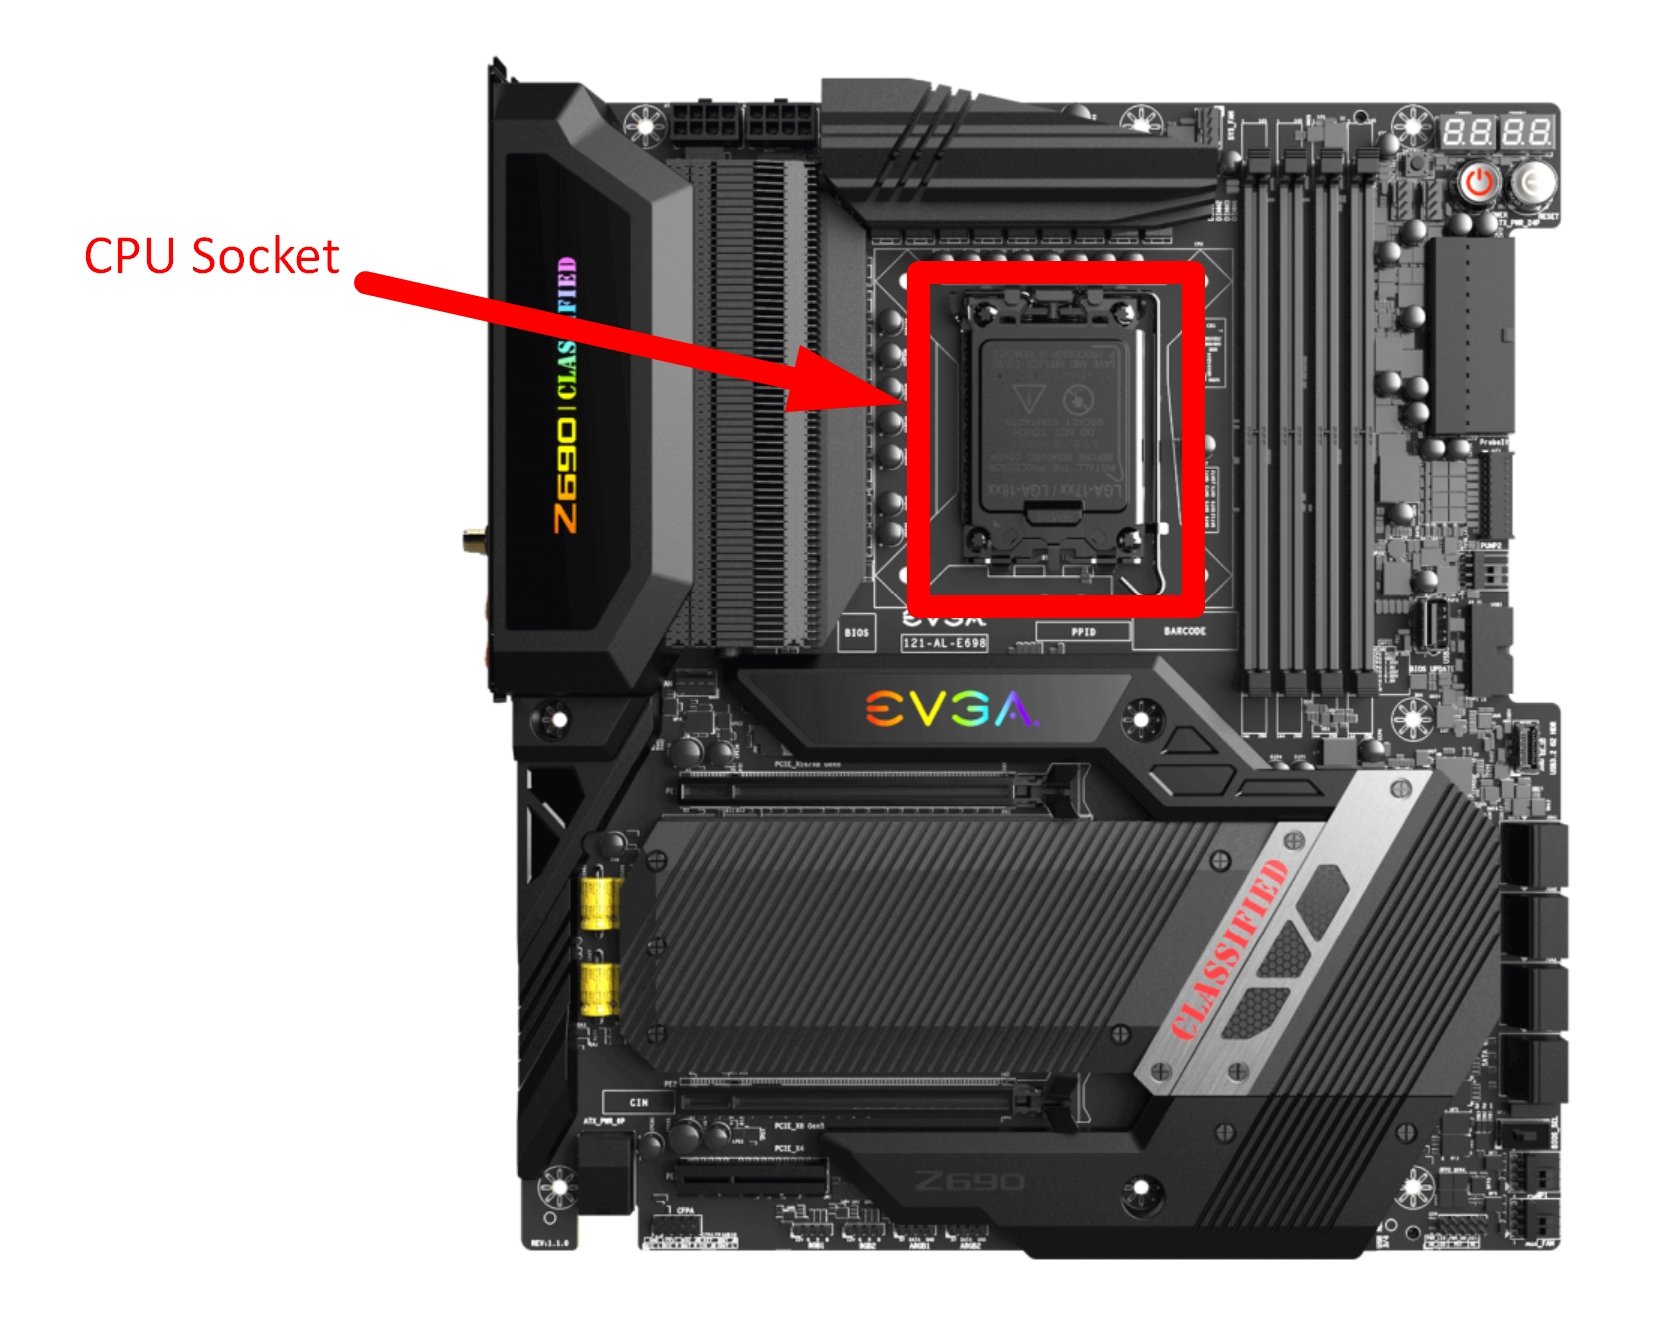
CPU Socket on a Motherboard
CPU Power Connector(s)
Used for power delivery to the CPU. Your motherboard could offer either simple 8-pin, 8+4 pin, 4 pin, or 8+8 pin power inputs.
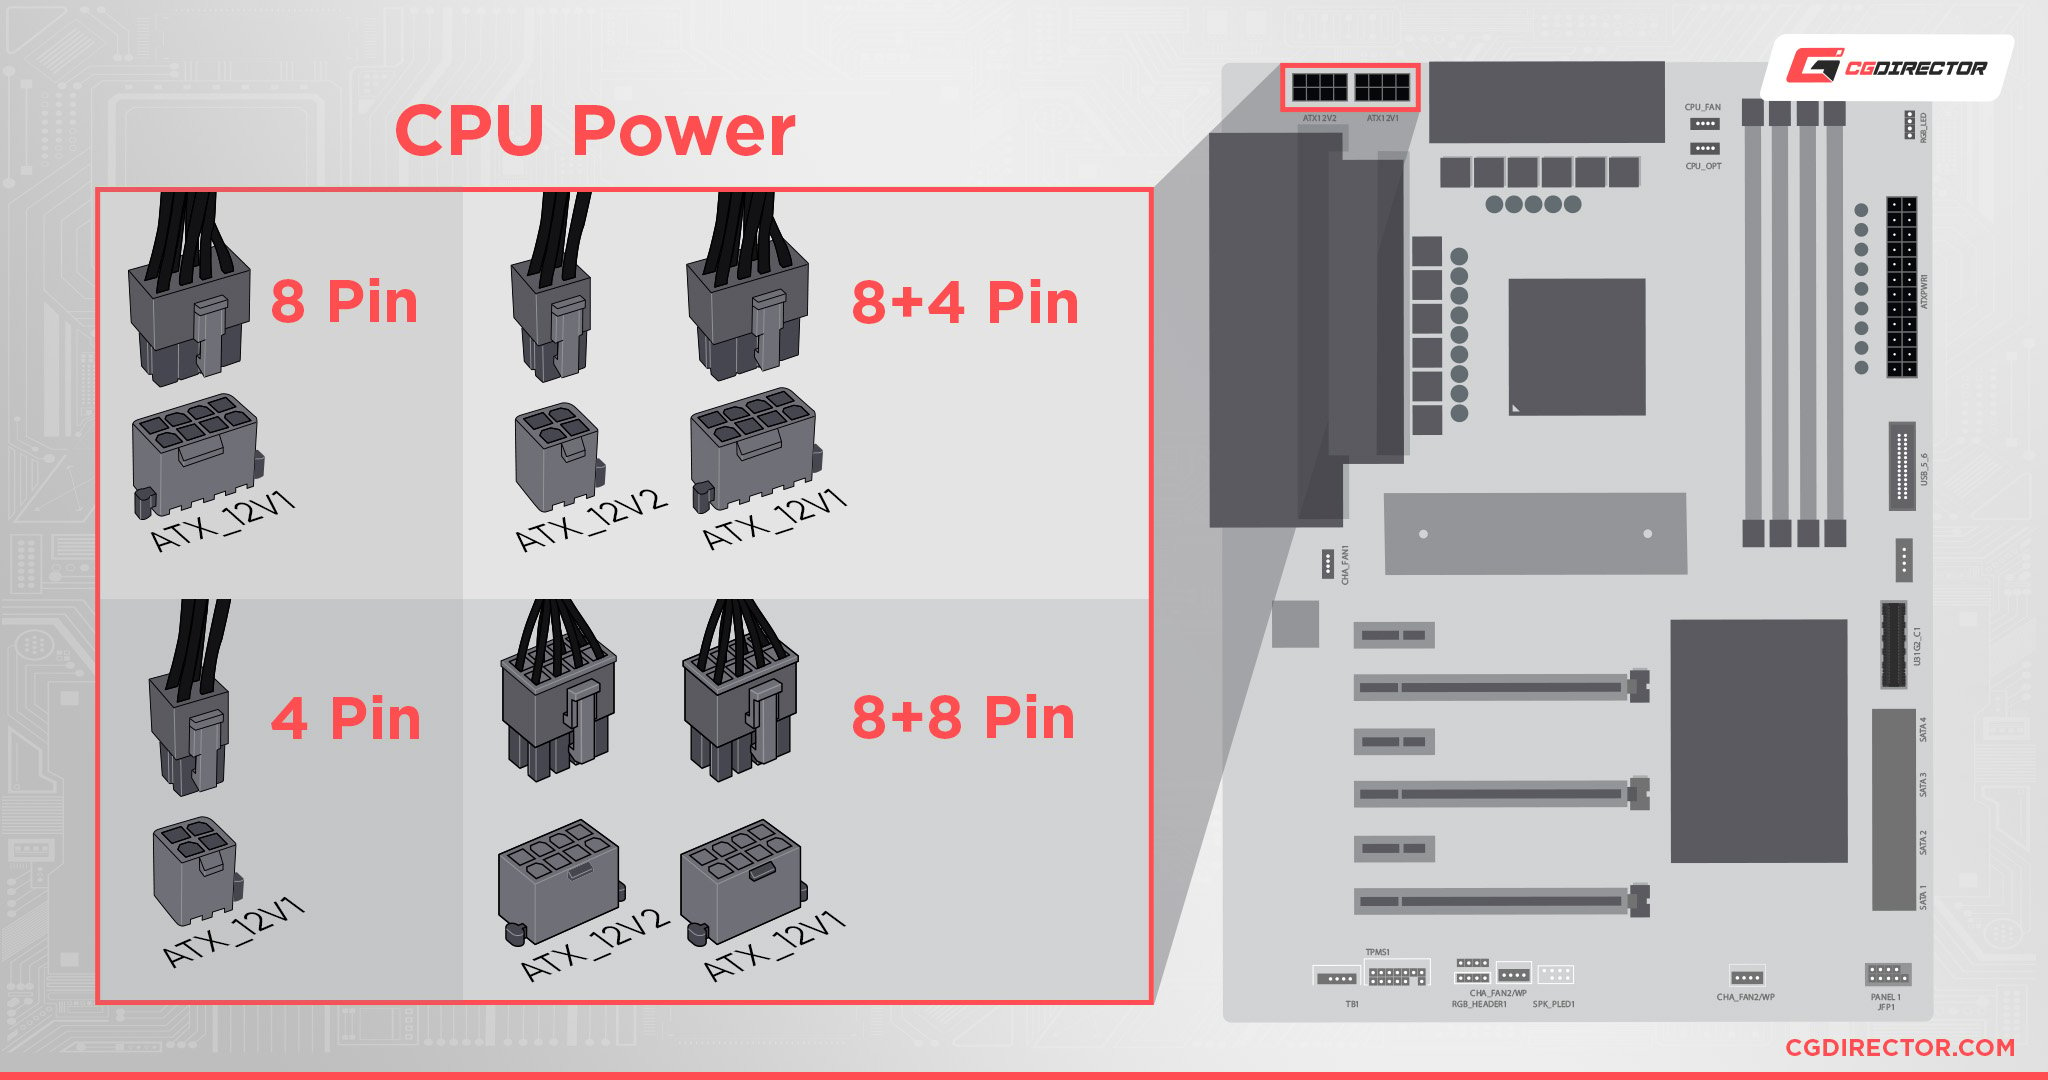
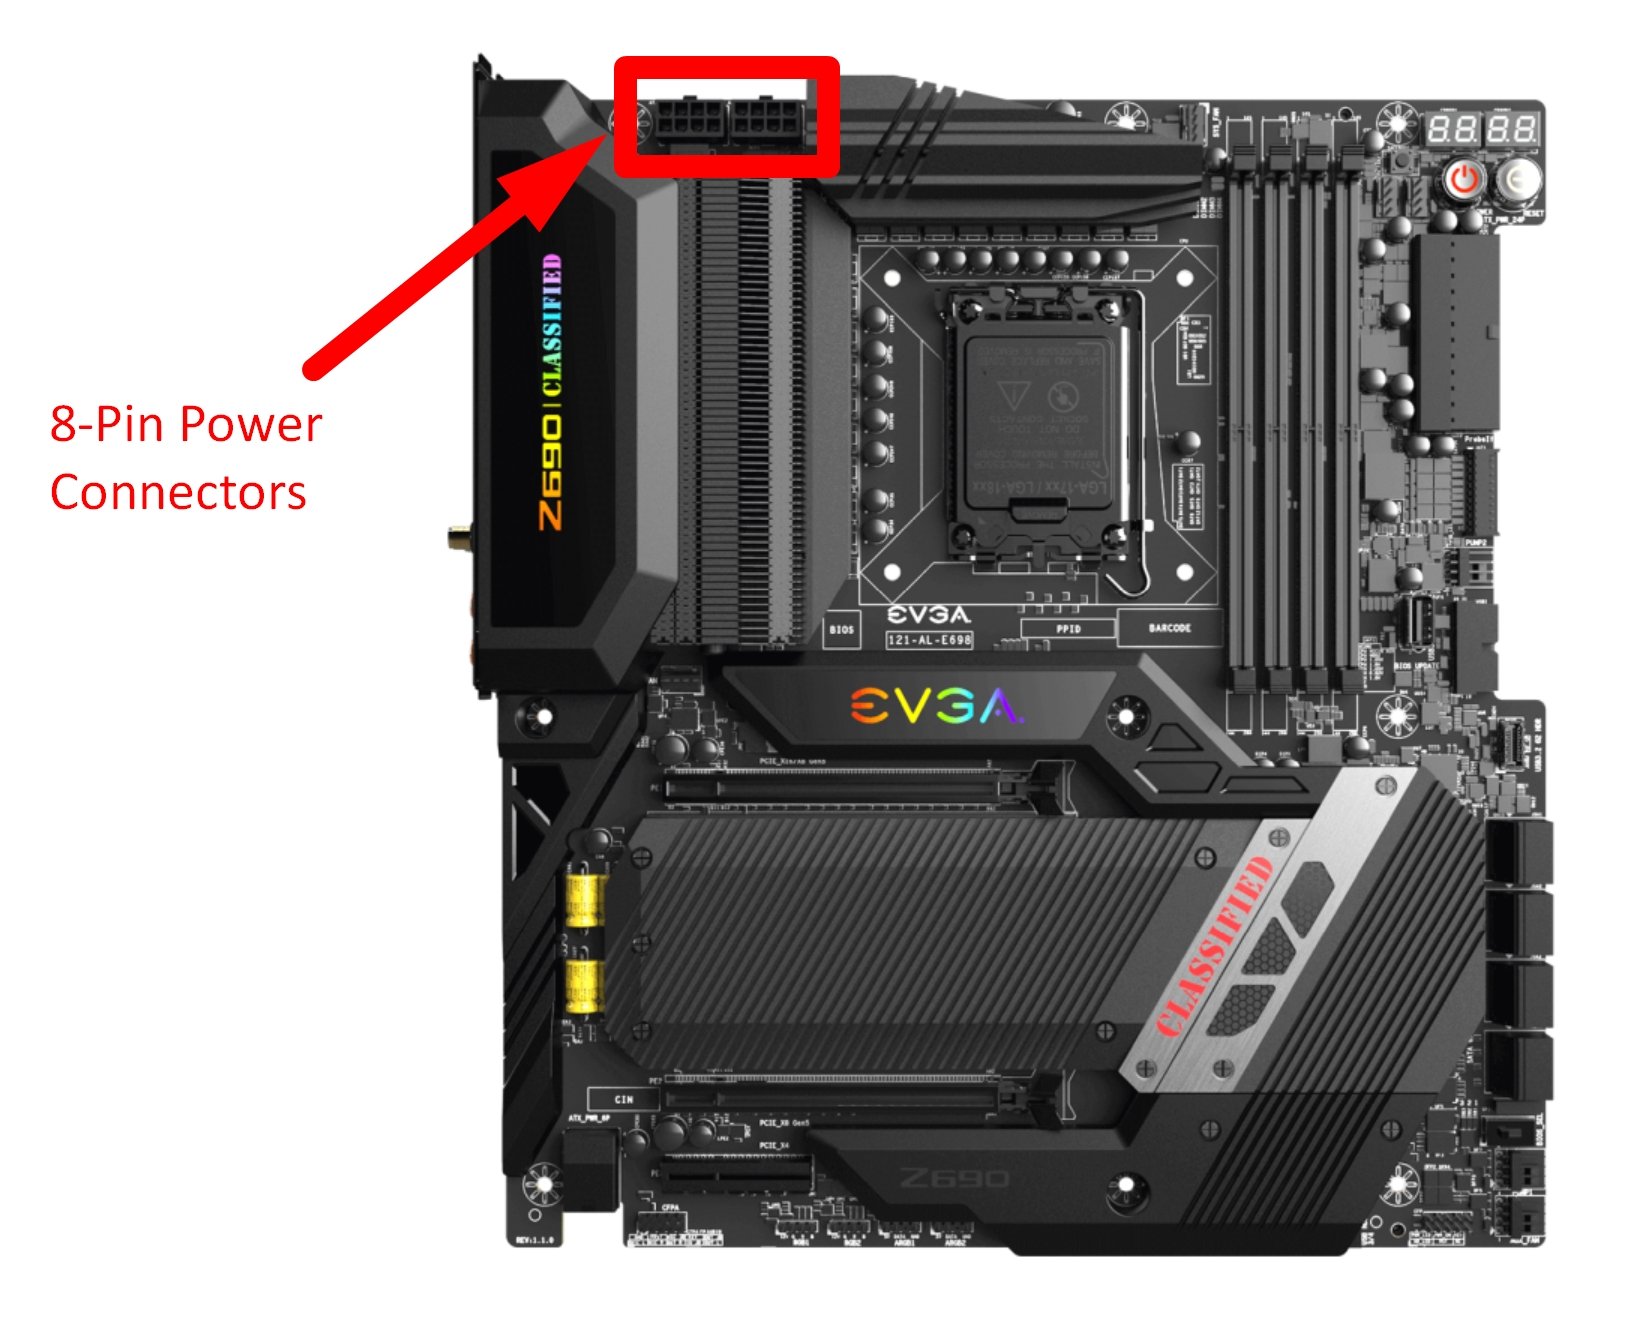
8-Pin CPU Power Connector(s) on Motherboard
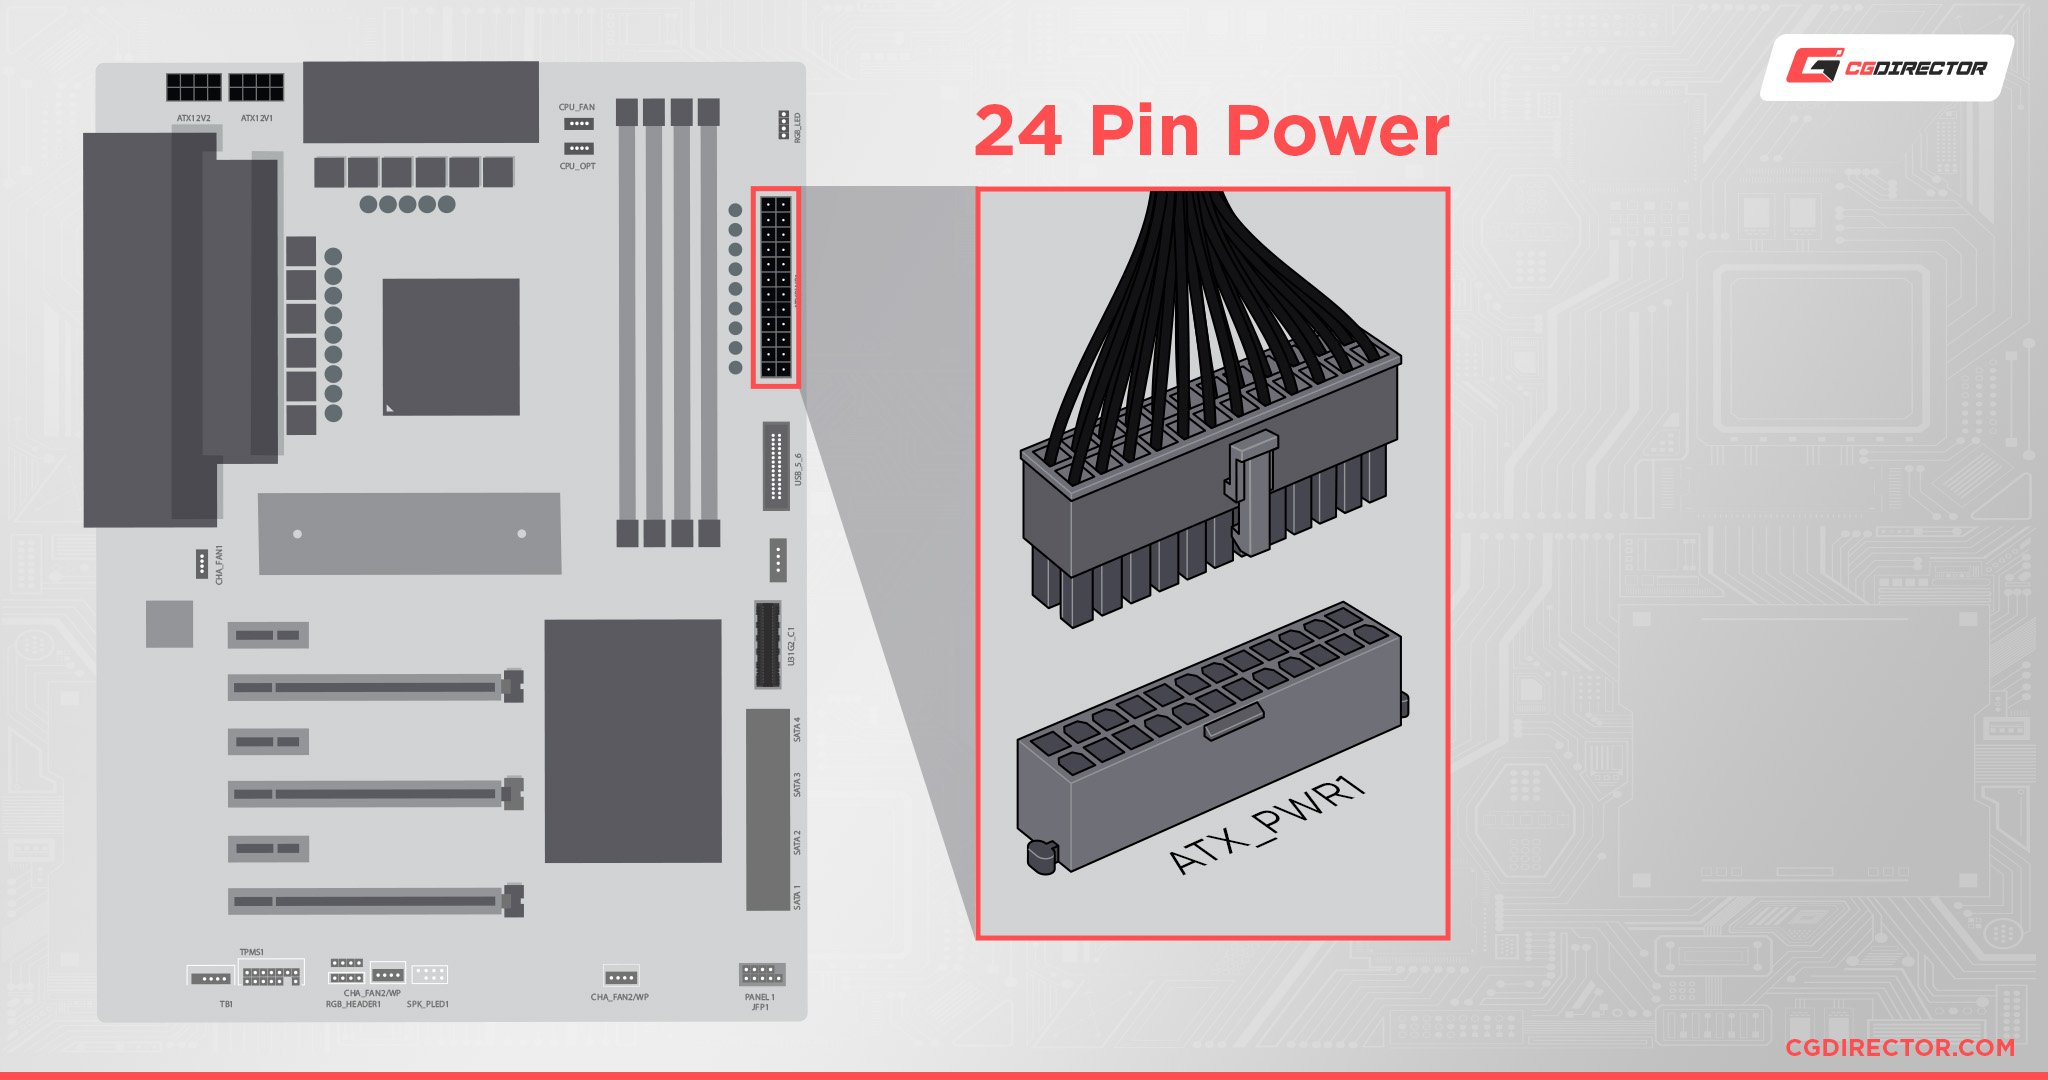
20-Pin ATX Power Connector
Used for general power delivery to the motherboard.
CPU Fan Header
Will be labeled as CPU_FAN (or something along those lines) on the motherboard. Although it’s meant for your CPU cooler, it visually looks like any other 4-Pin Fan header without confirming the “CPU” text and proximity to the CPU.
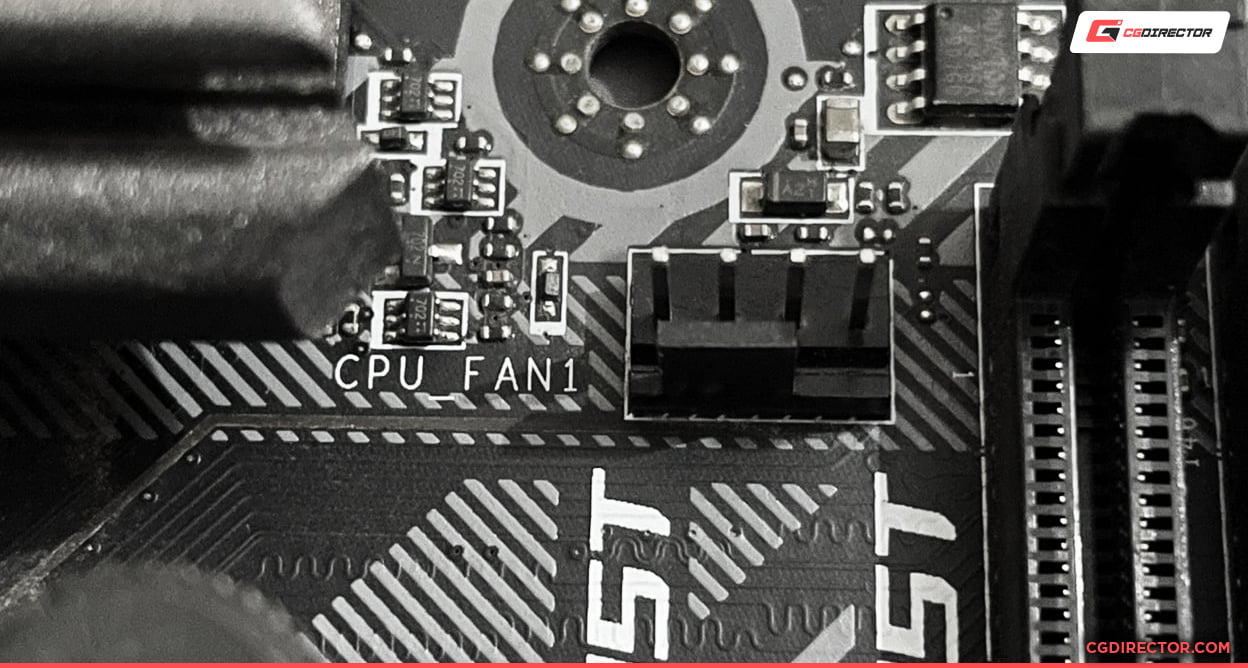
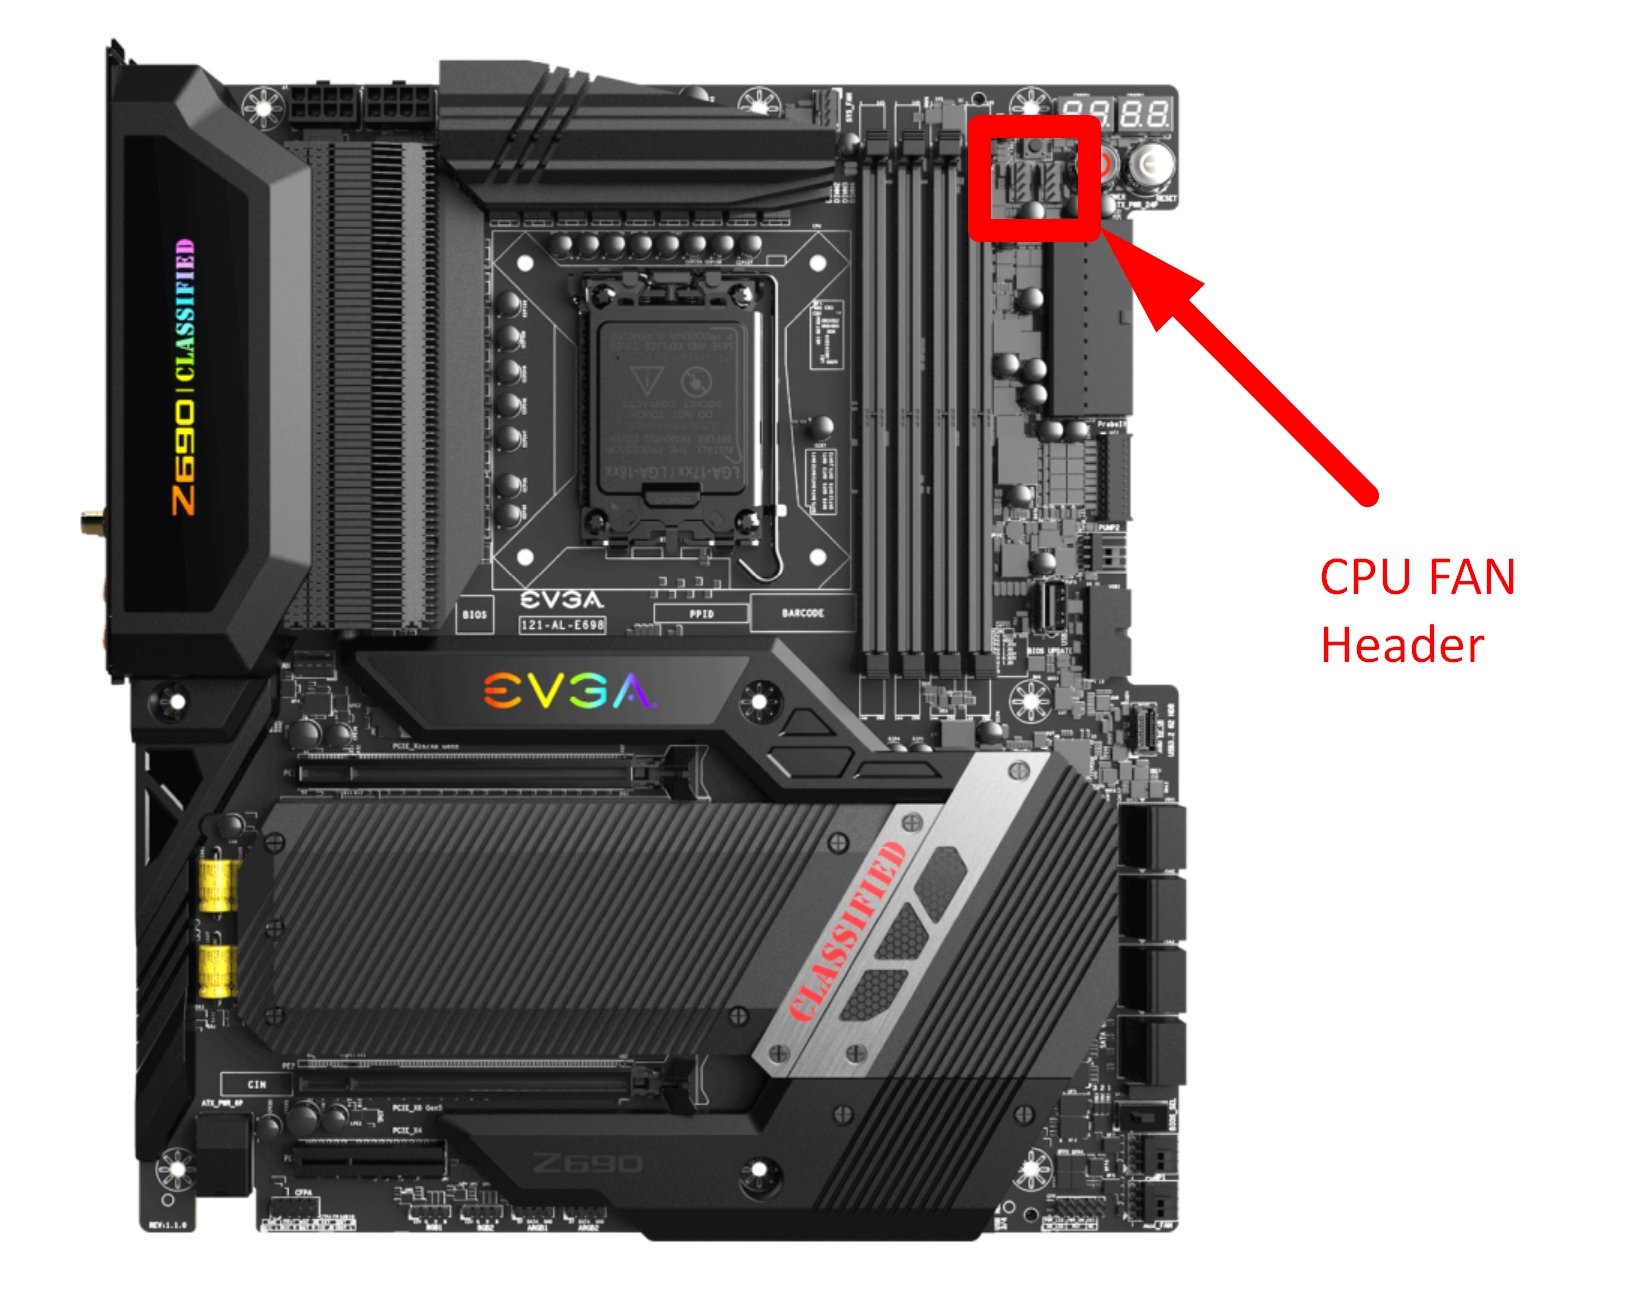
CPU Fan Header Position on Motherboard
VRMs (Voltage Regulator Modules)
VRMs determine how well your motherboard manages power for core components like CPU and RAM. For this reason, premium VRMs are sought after in high-end overclockers’ motherboards.
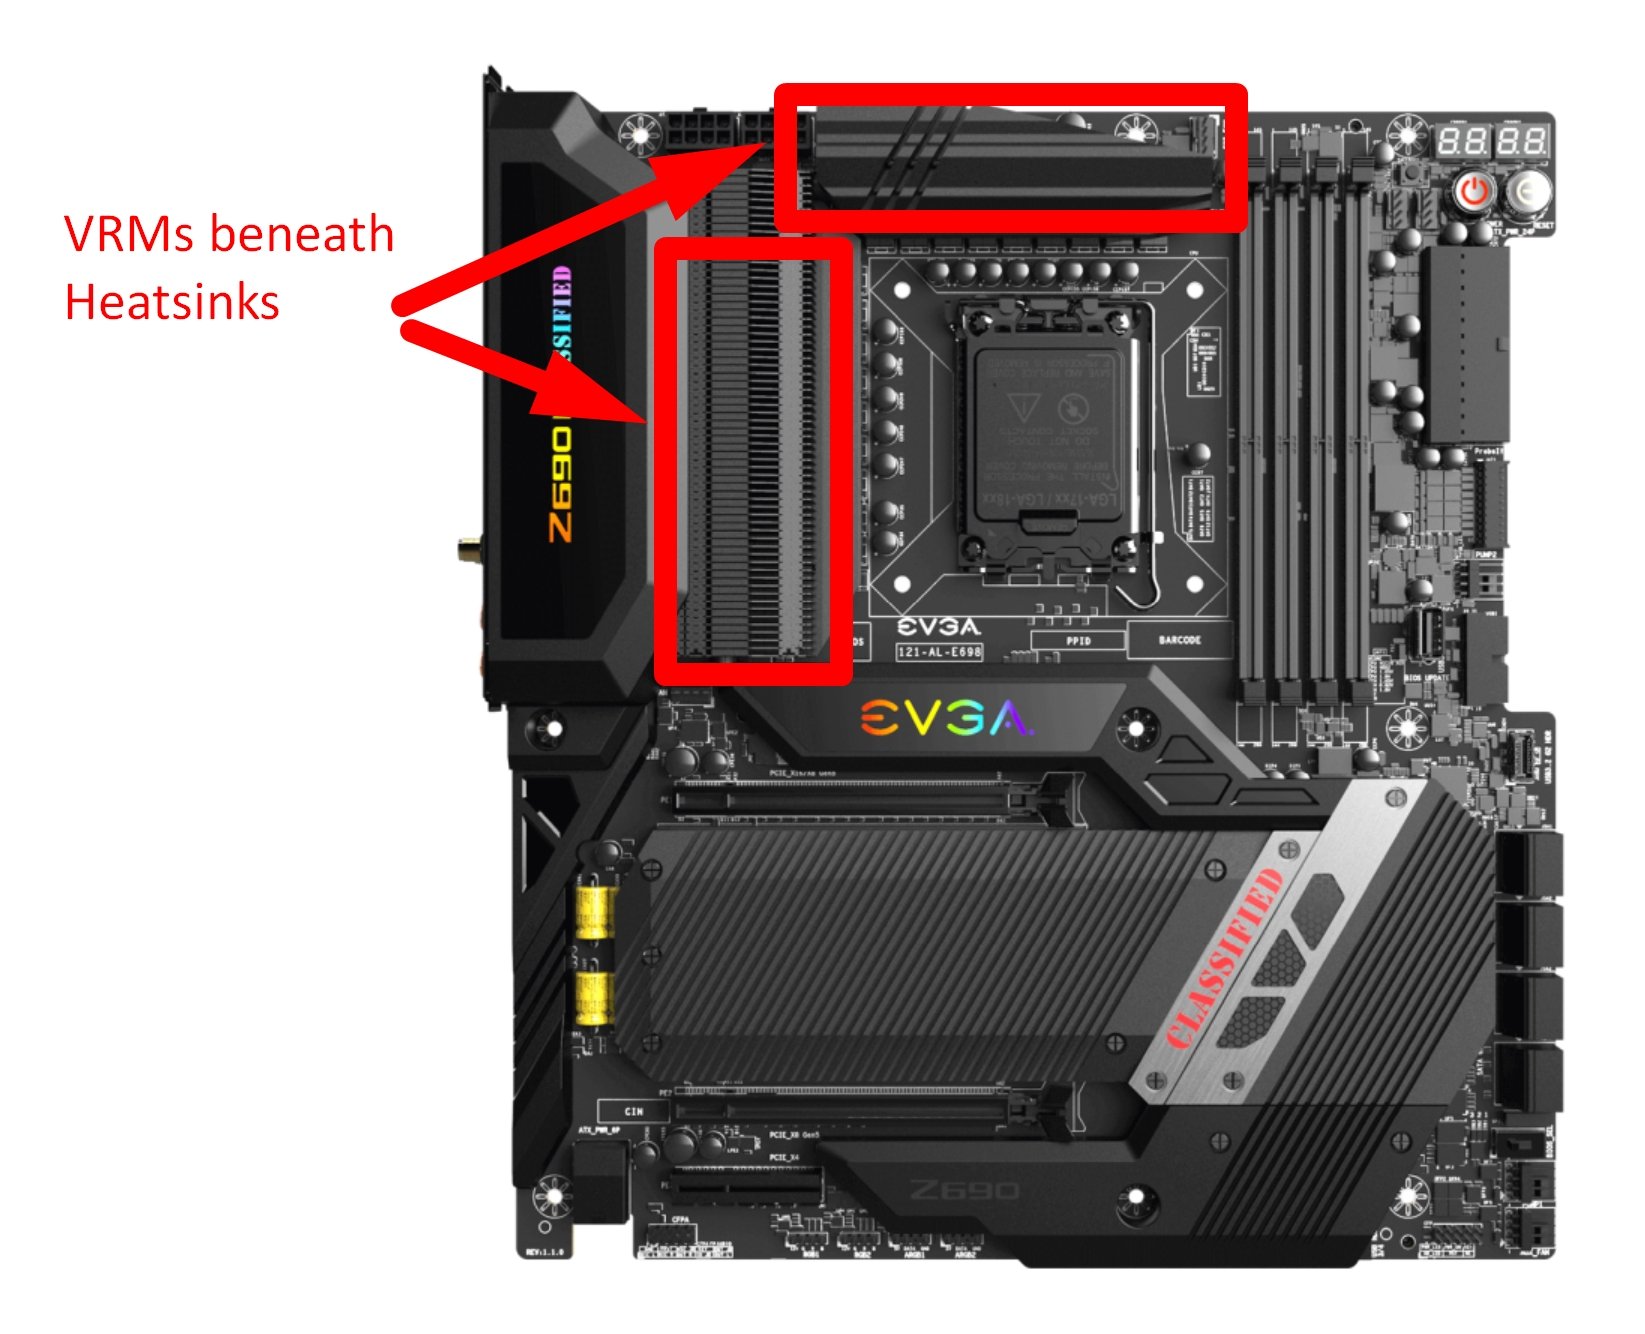
VRMs on Motherboard
RAM Slots
Holds your RAM. Always placed as close as possible to the CPU socket to ensure the shortest circuit traces between the CPU and the PC’s memory for a clean signal.
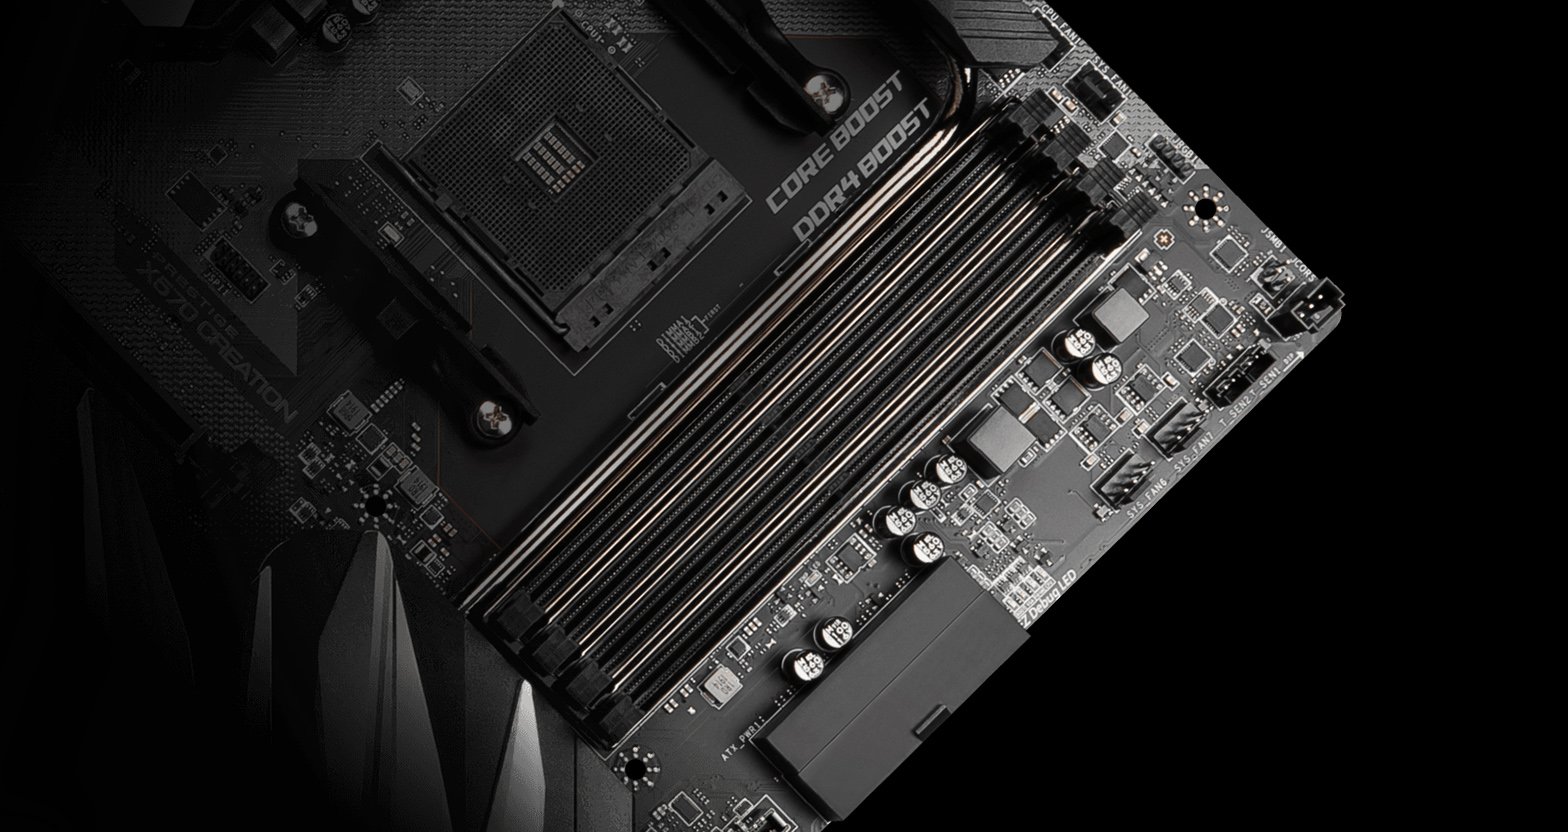
Image Credit: MSI
Chipset
Pretty much the middle-man between your CPU and the rest of your PC. Determines many of your motherboard’s features, including CPU overclocking, max RAM speed, and PCIe lanes.
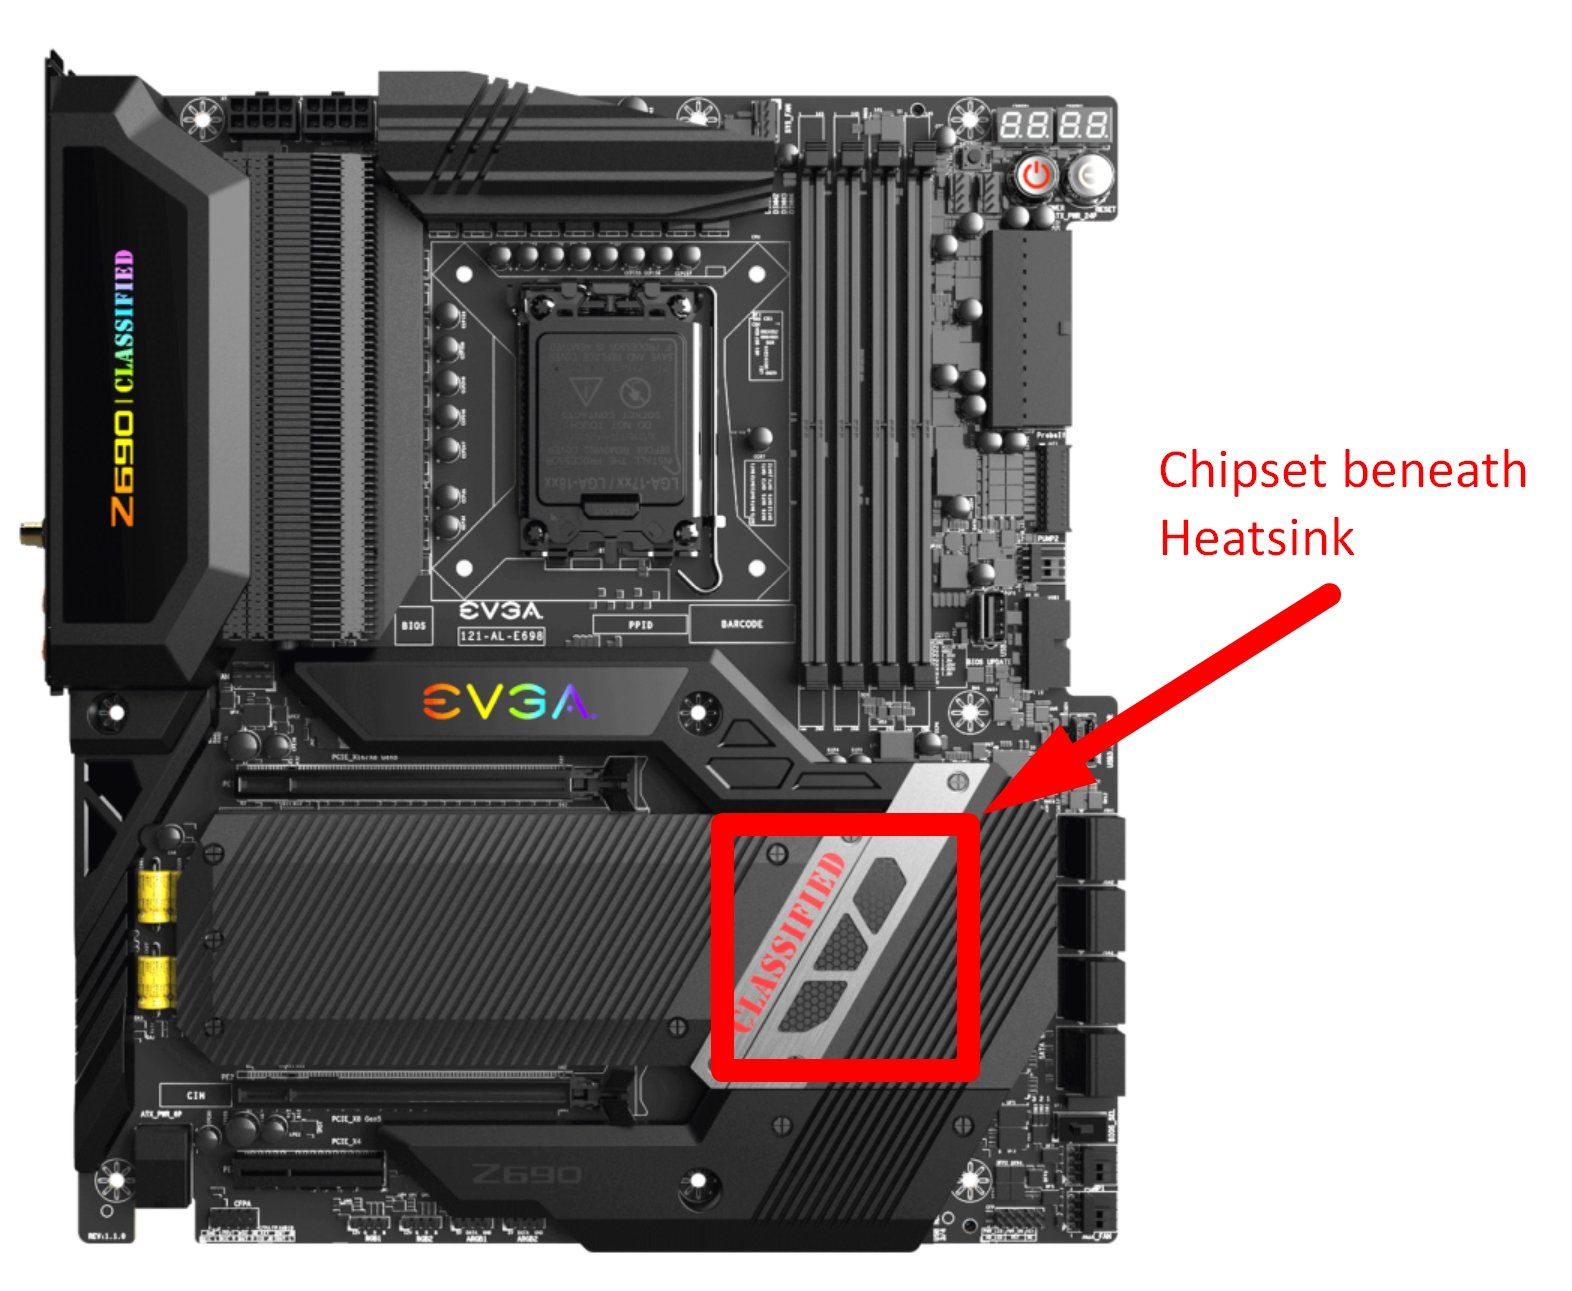
Chipset Position on Motherboard
Heatsink(s)
Parts of the motherboard that require cooling, such as the chipset, will generally have heatsinks. High-performance motherboards may have extra or larger heatsinks.
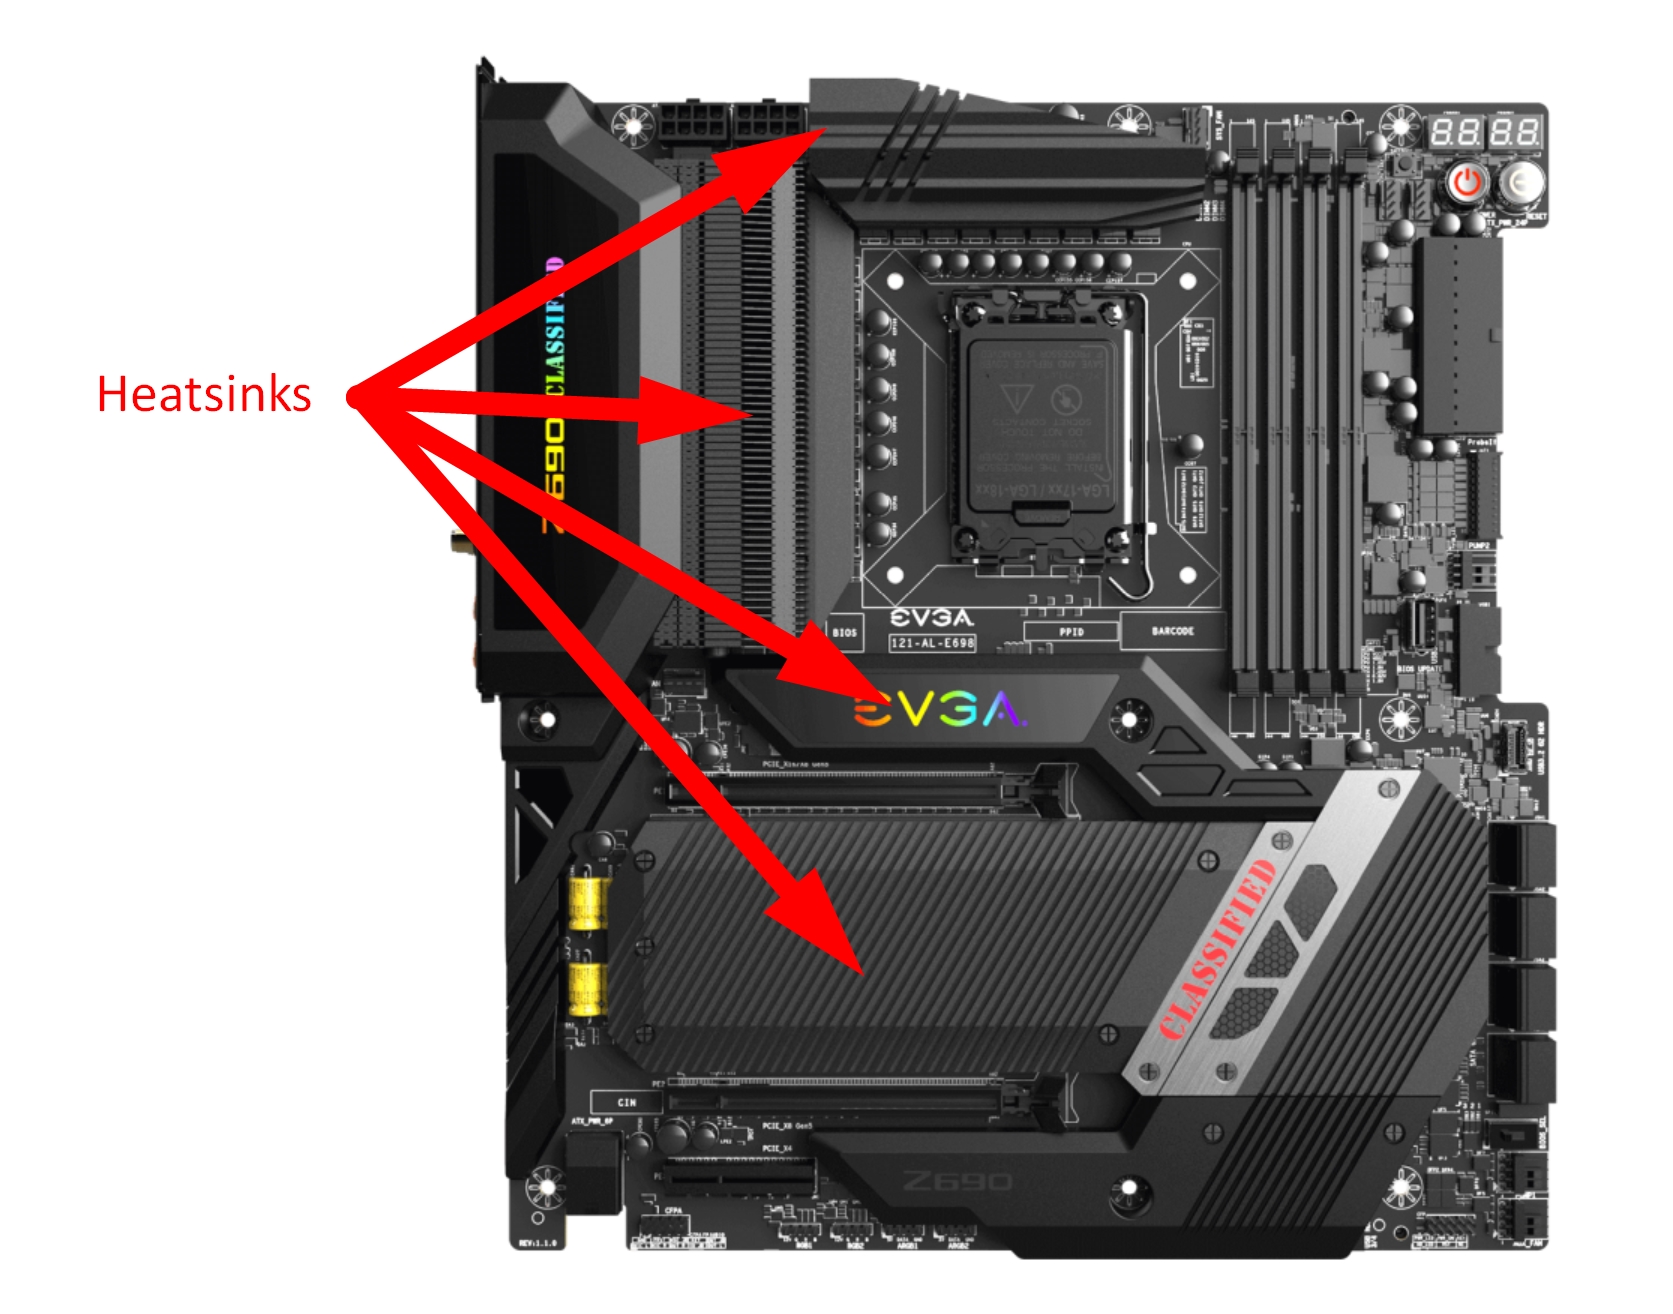
Heatsinks on Motherboard
SATA Ports
Used to connect your SATA-based HDDs and SSDs.
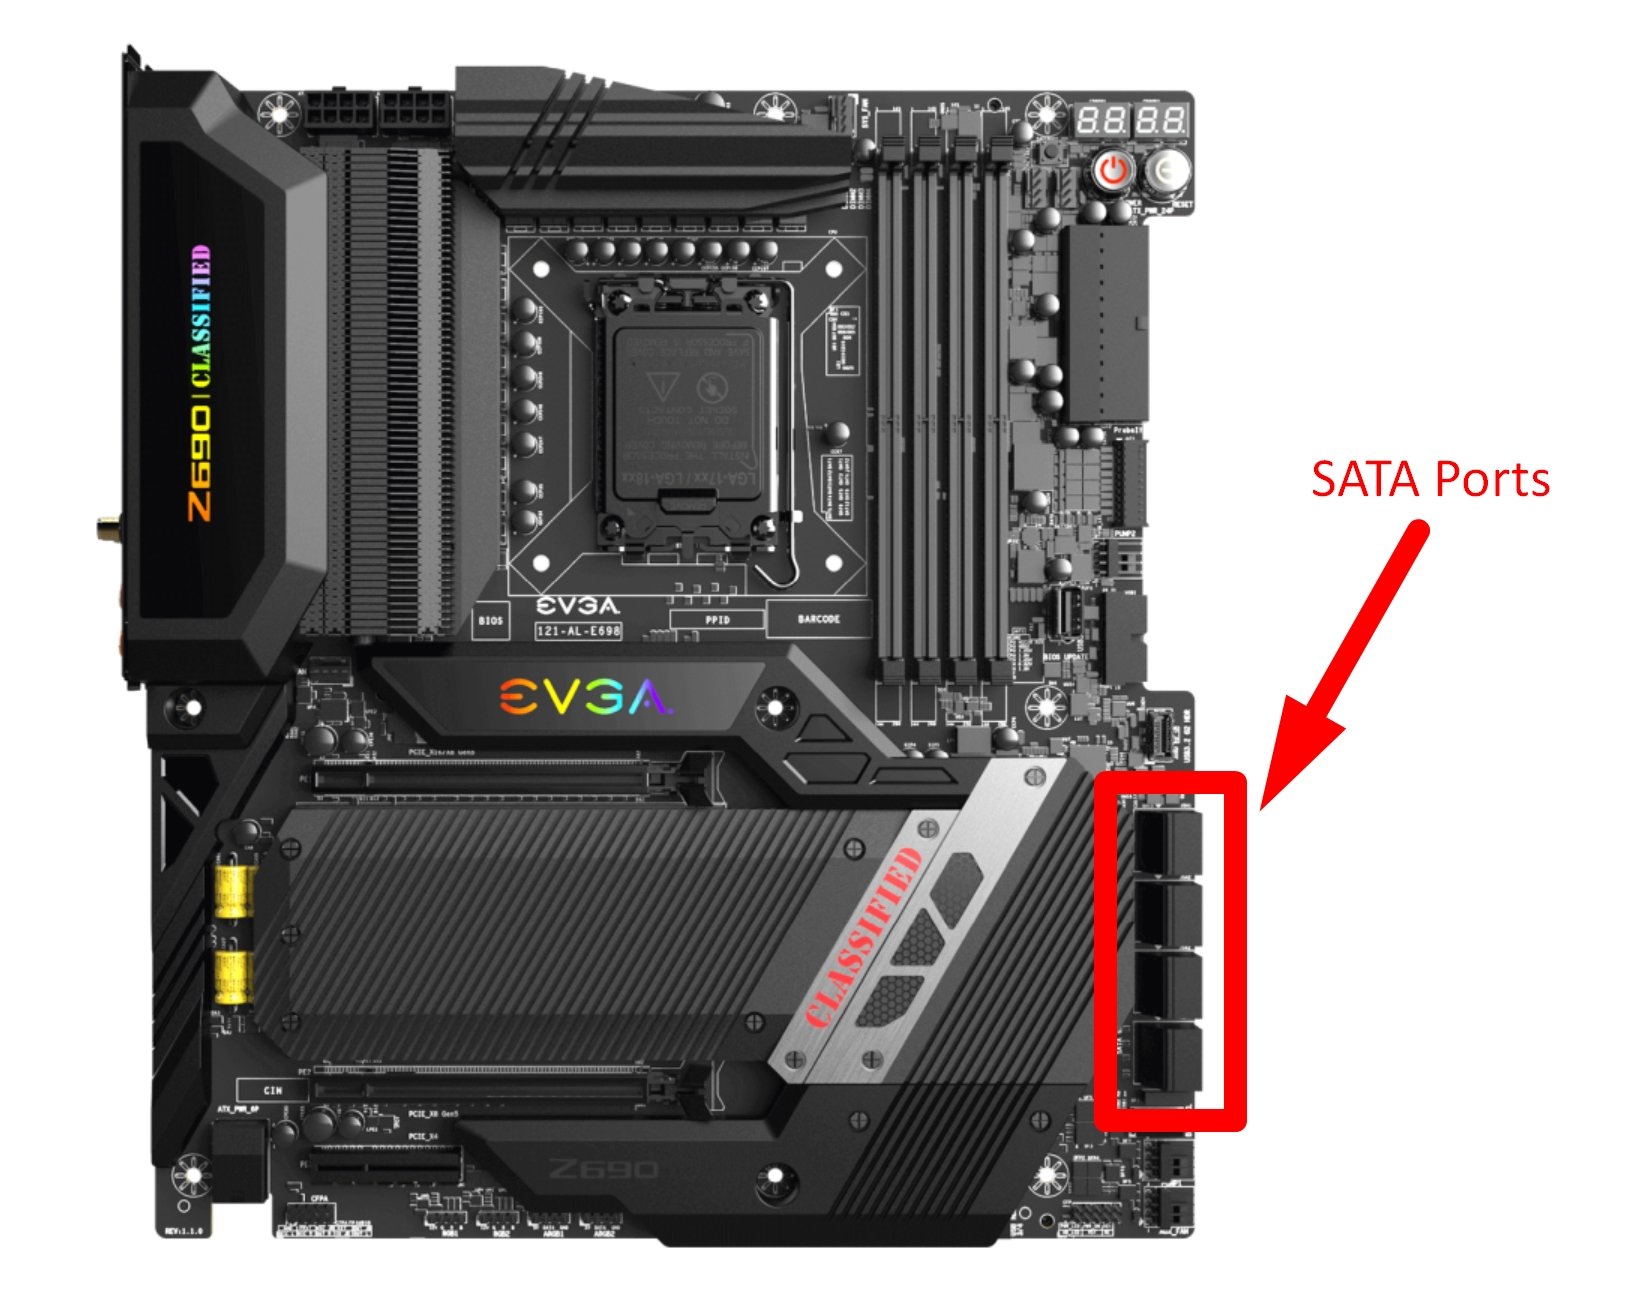
SATA Ports on Motherboard
M.2 Slots
They can come in either SATA M.2 or NVMe M.2 variations. Double-check what type of storage device your motherboard and CPU support before buying an M.2 drive. Most modern processors and motherboards should support NVMe, though.
M.2 SATA ports are more common on budget and Mini ITX/laptop motherboards and very uncommon on mid to high-end boards.
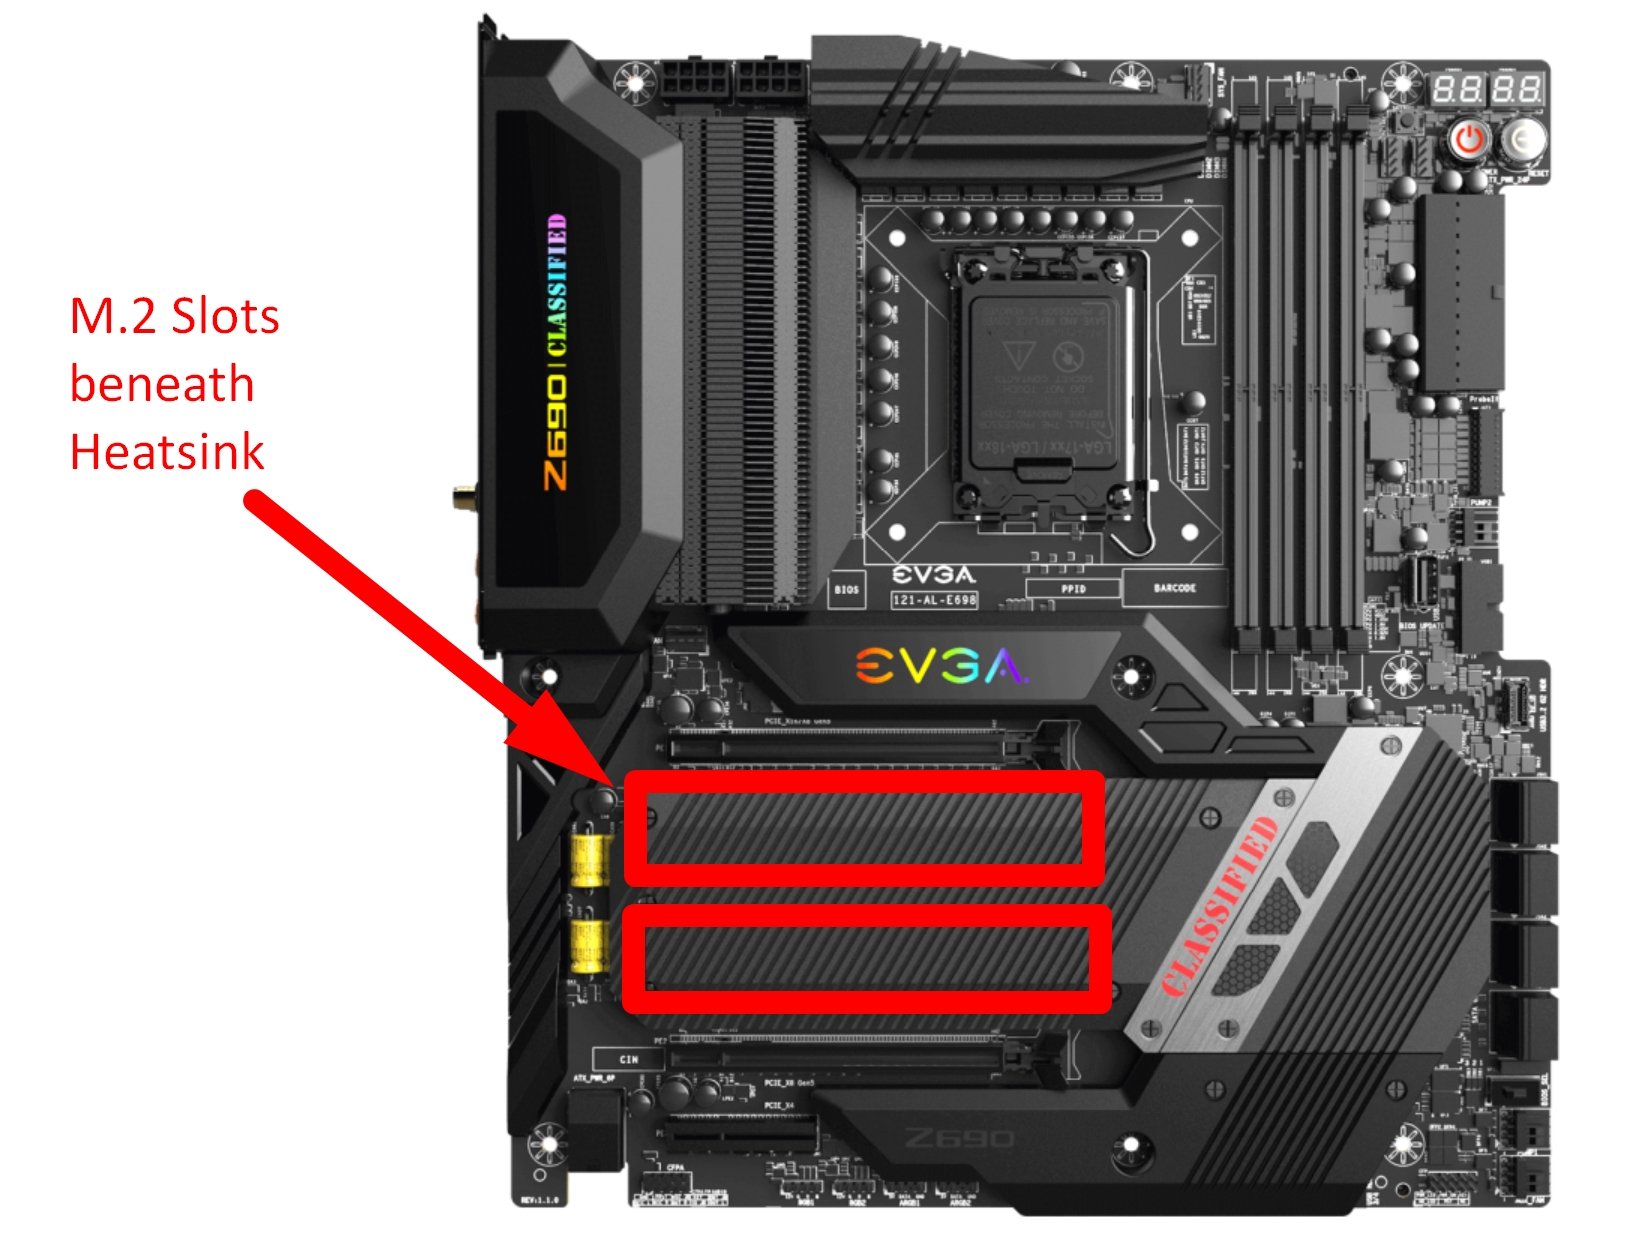
M2 Slots on Motherboard
Front Panel Headers
Used for your PC case’s power and reset buttons, etc.
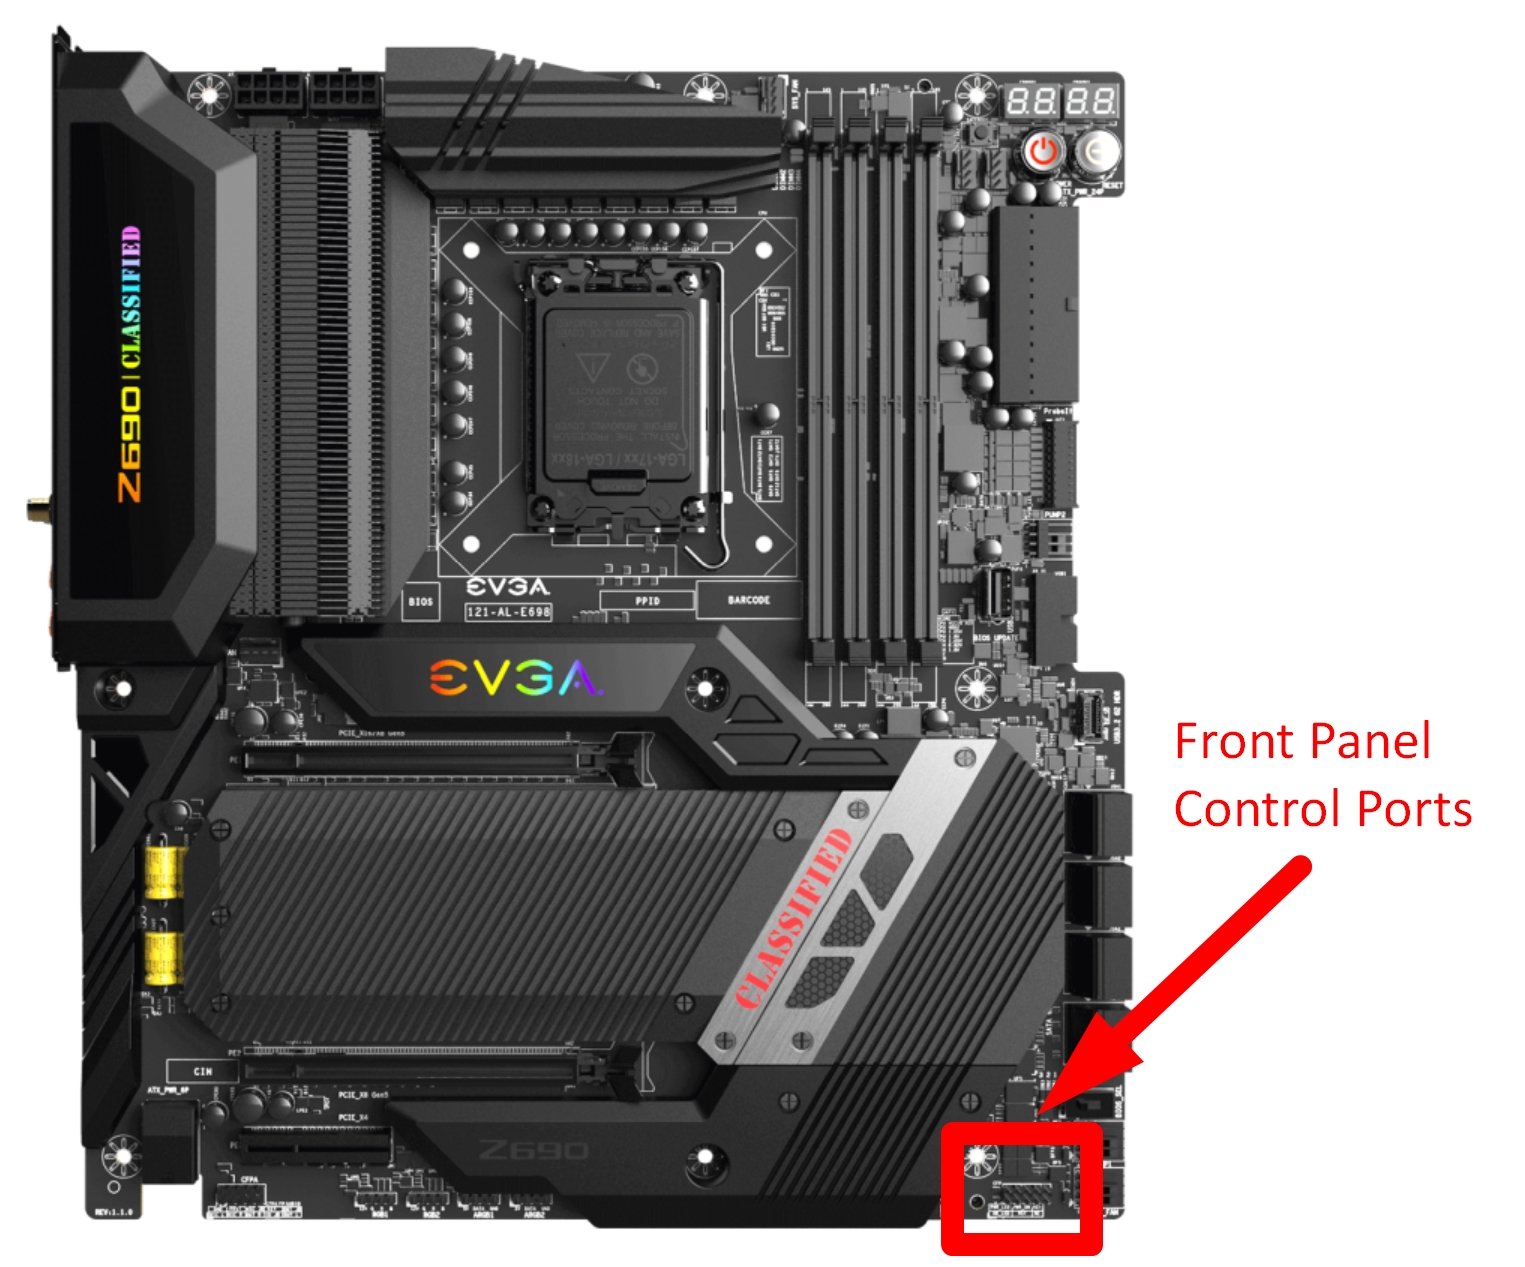
Front Panel Case Control Ports on Motherboard
Front Panel I/O
Used for things like your front panel USB 3.0 or Type-C ports.
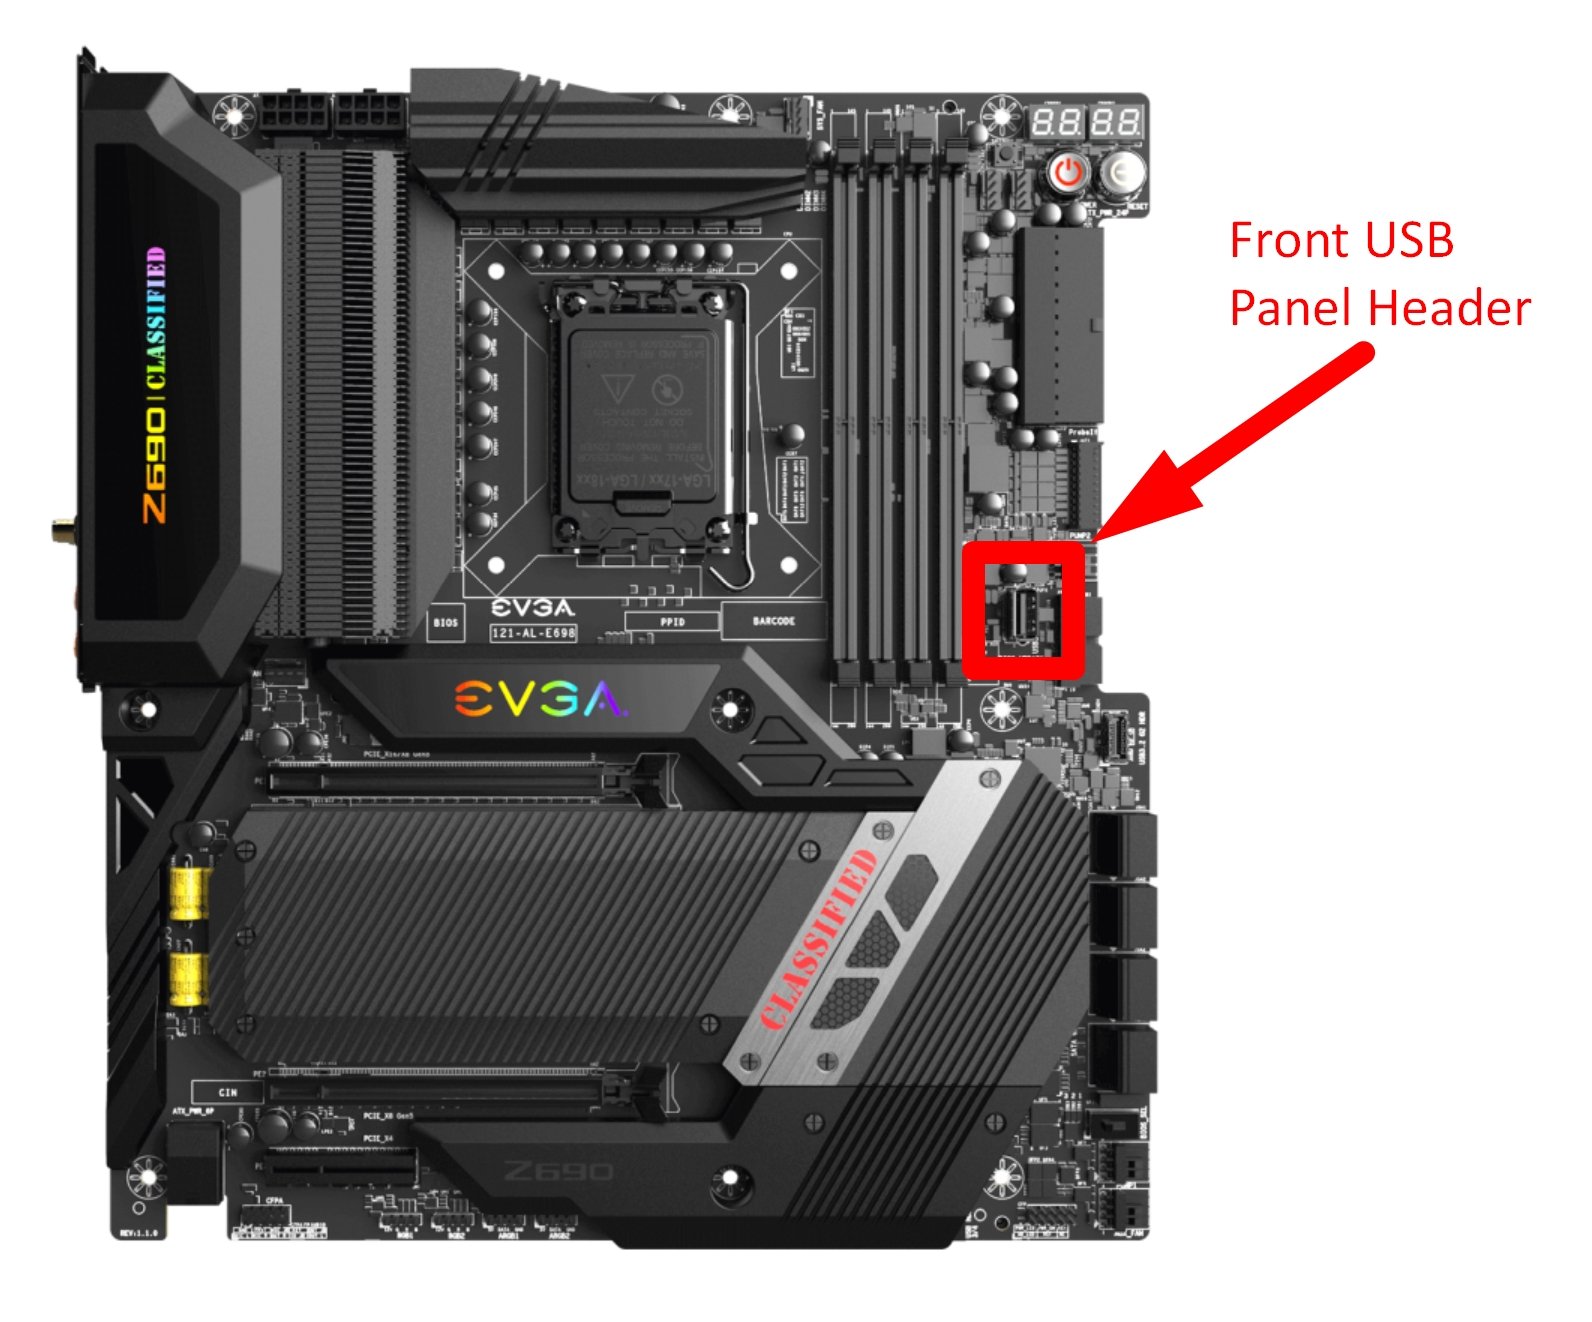
Front USB Panel Header on Motherboard
4-Pin Fan Headers
Used for CPU cooler fans and other fans with PWM (Pulse Width Modulation) support, which allows for controlled fan speeds.
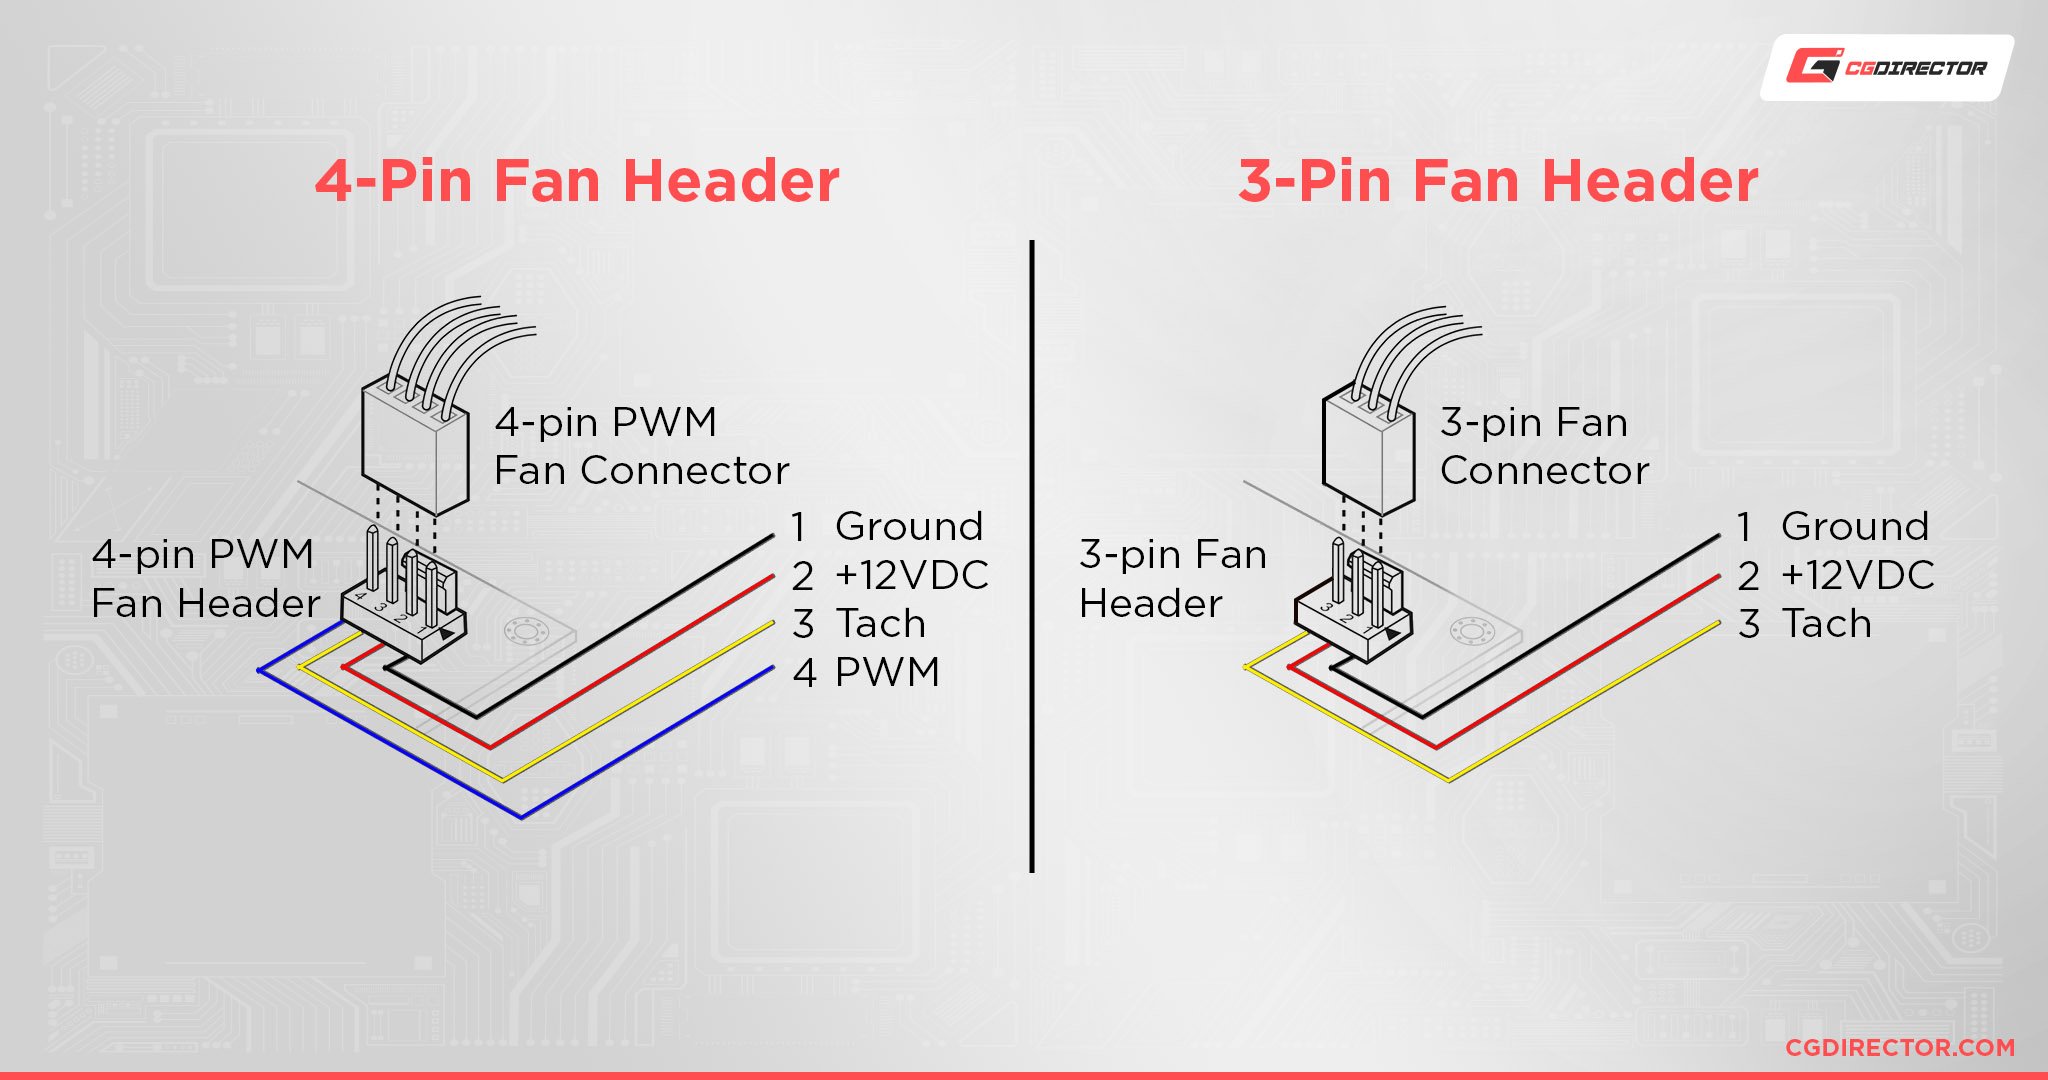
3-Pin Fan Headers
Used for non-PWM fans without controls for fan speeds. In our article about PWM and DC fan headers, you can find out more about these fan connectors.
ARGB and RGB Headers for Lighting Control
Dedicated ports for lighting control. Most common on gaming and high-end motherboards, and not so much on a budget or older motherboards. You’ll use these for your RGB fan controller or RGB components.
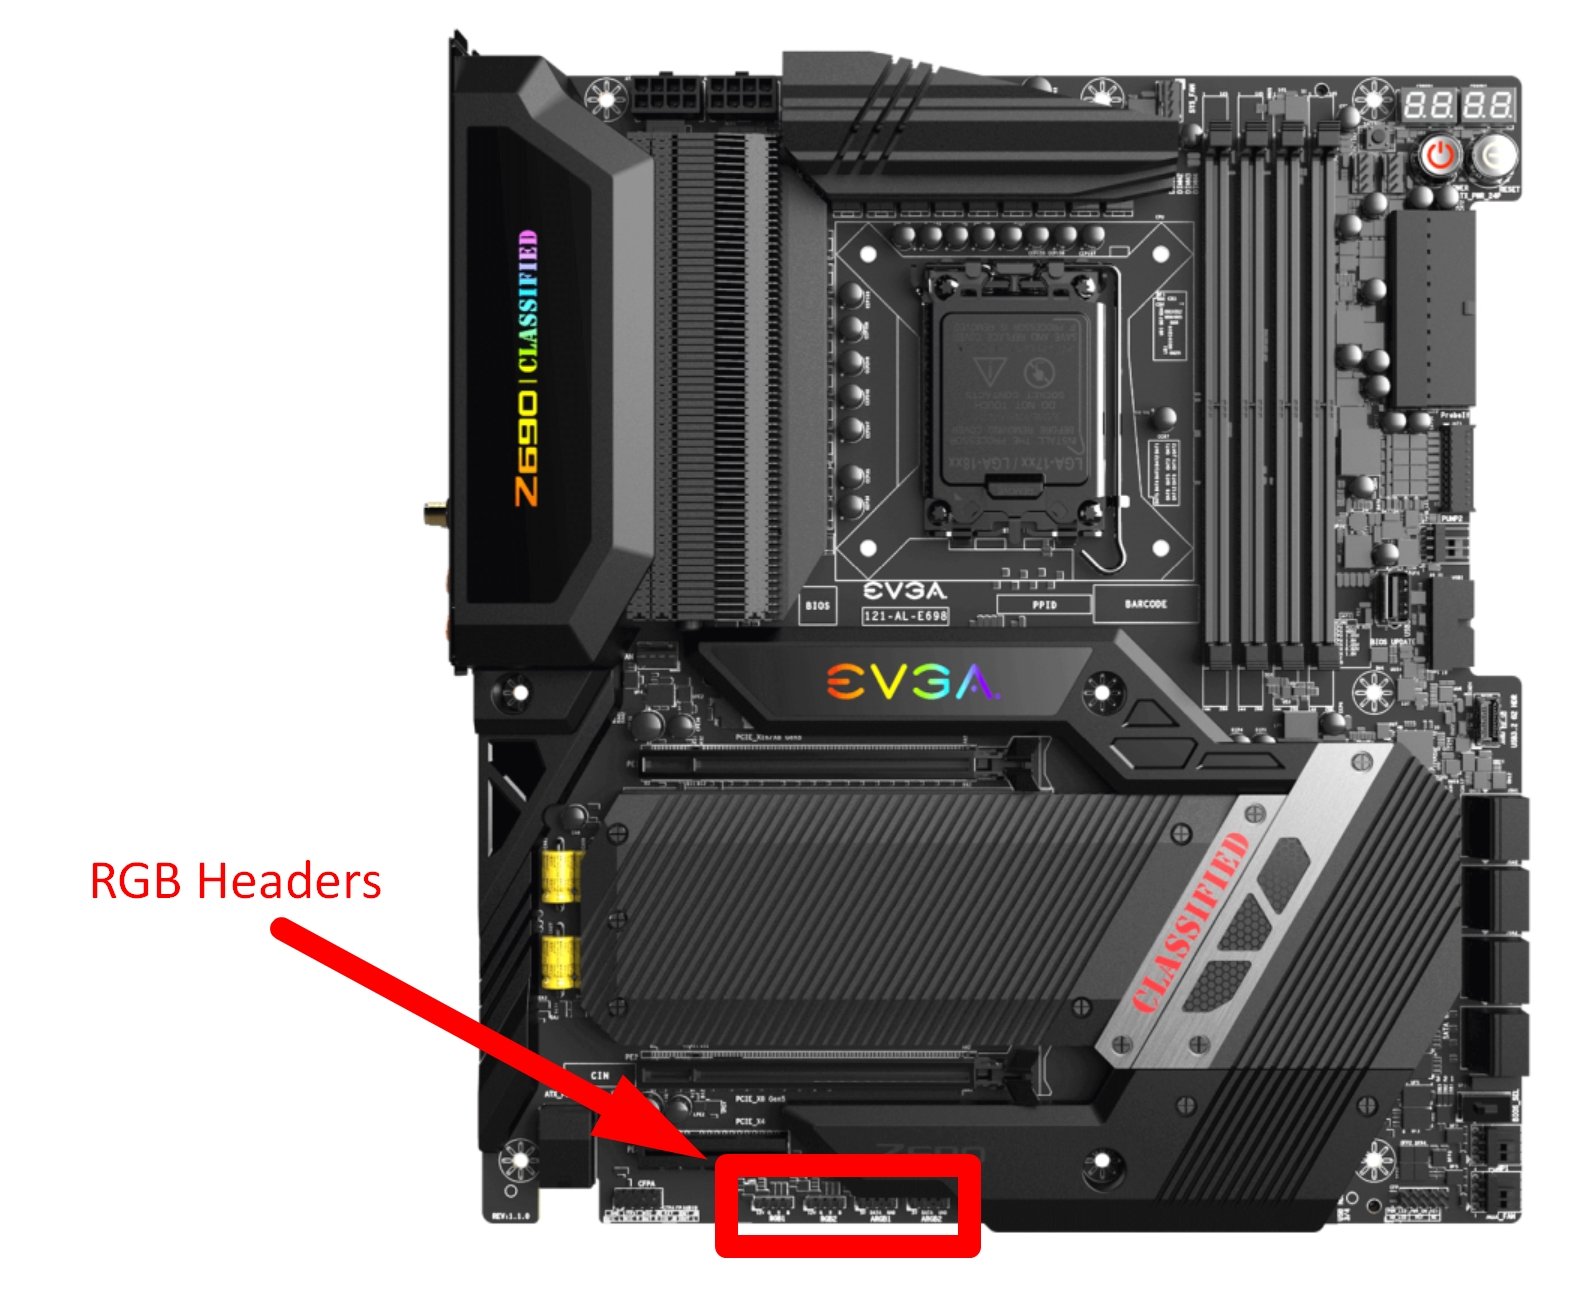
RGB Headers on Motherboard
Onboard Audio Hardware and Sound Card
An onboard sound chip and capacitors are built into all modern consumer motherboards to provide onboard sound without requiring an external sound card. Their capabilities can vary though.
Onboard Networking Hardware
Onboard network chips connecting to the Ethernet ports and/or antenna ports on the I/O of the motherboard enable networking.
This is also a standard feature of pretty much every modern consumer motherboard today. But if you have heavy-duty networking needs, you might still need to consider a dedicated network card— or at least a higher-end board with a faster integrated solution.
How are Motherboards Manufactured?
So, with an understanding of the key components that go into a motherboard in mind, how are motherboards actually manufactured?
With the information we’ve covered, it’s pretty easy to sum things up. I don’t really have the scale required to describe literally everything that happens in the motherboard manufacturing process, but I can give you an excellent baseline understanding.
There are dozens upon dozens of distinct machines and steps in the motherboard manufacturing process, so this will be a somewhat simplified take on what happens.
First, the basic printed circuit board (PCB) is created from layers of fiberglass merged together, after which a coating of copper is placed on the top and bottom.
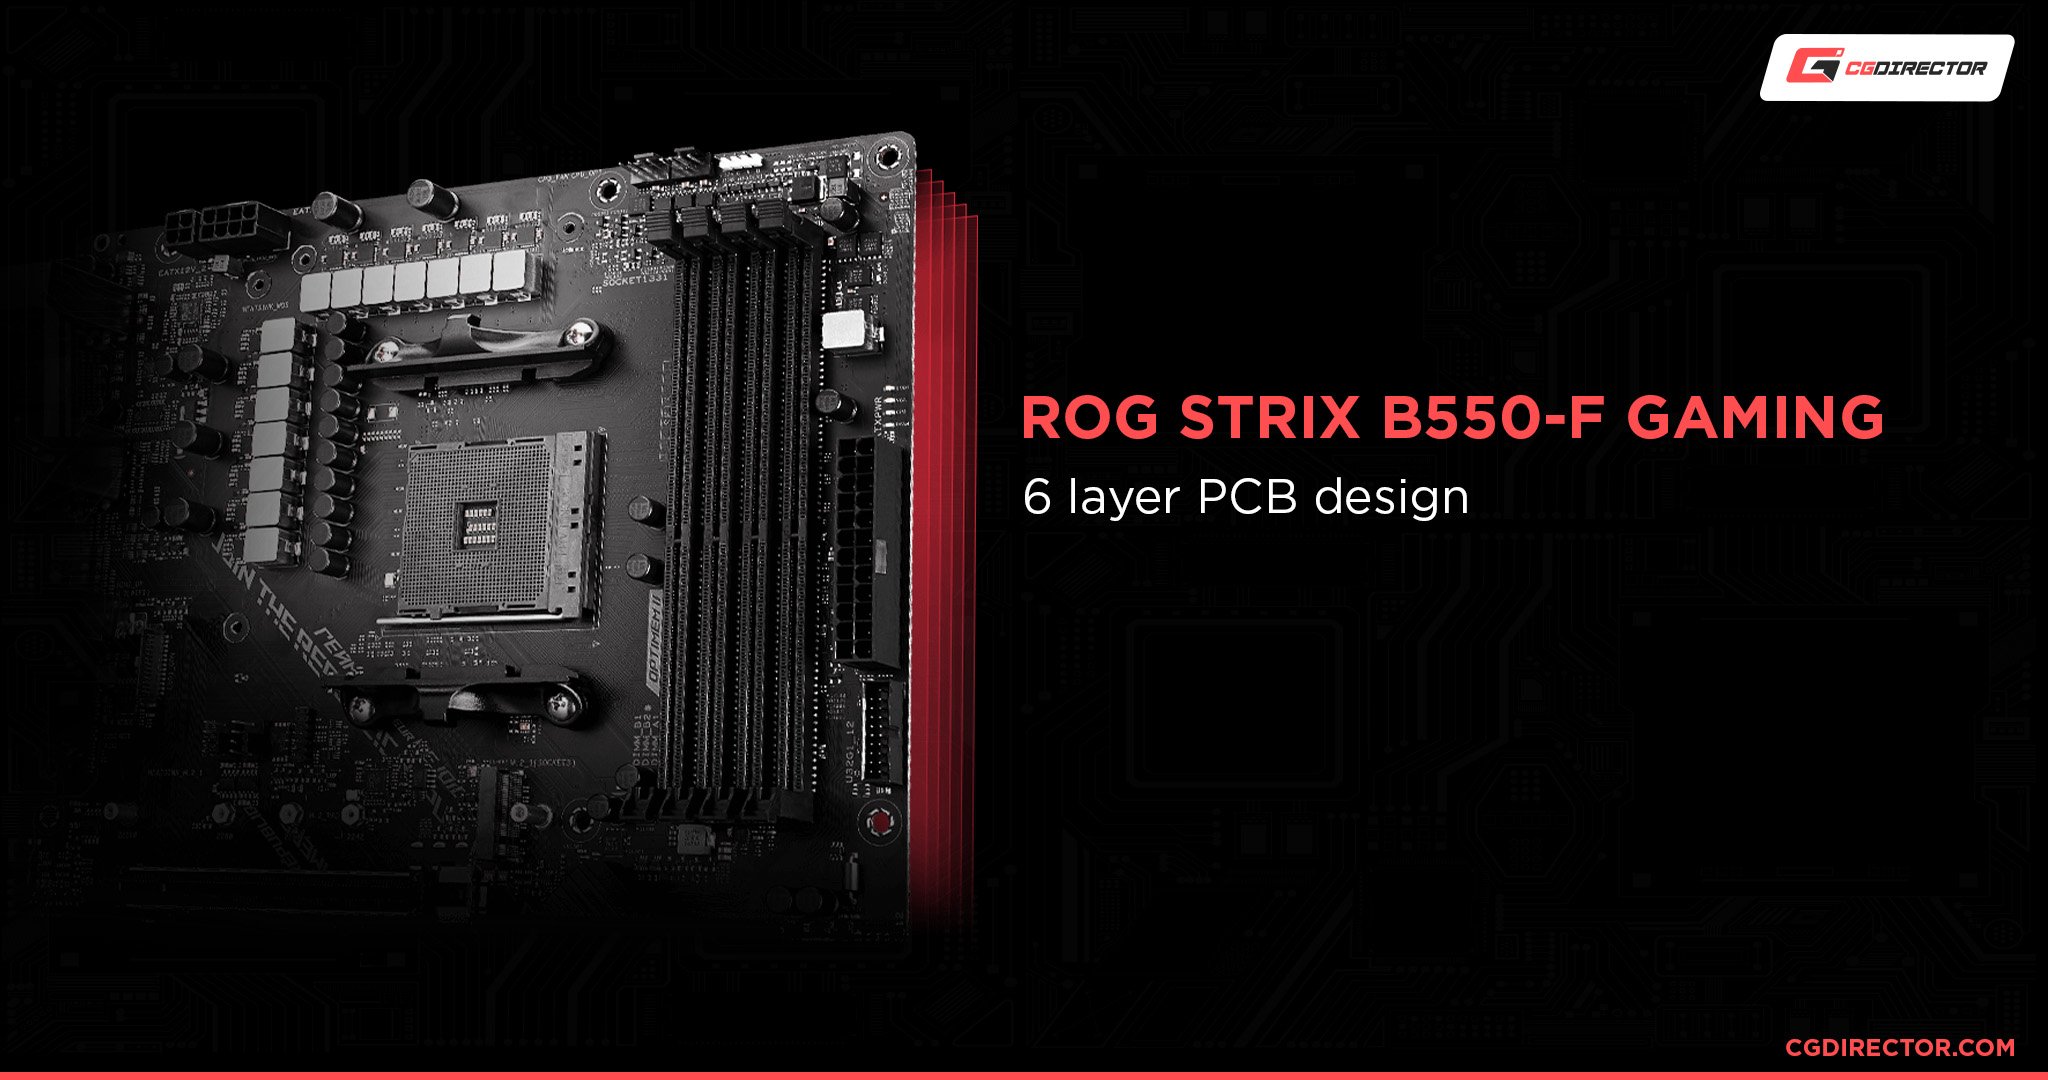
Source: ROG ASUS
A separate chemical called photoresist is placed on the top layer to protect the future copper paths on the PCB.
The rest of the copper (unprotected by the photoresist) gets stripped away during manufacturing, leaving behind the basic motherboard PCB without any of its core chips or components installed yet.
That part comes next, through the use of SMT (Surface Mount Technology, not to be confused with Simultaneous Multi-Threading), which is used to install most components on the motherboard.
After that, capacitors and all hand-mounted components are placed within a Dual In-Line Package (DIP) production line.
As it turns out, several components are mounted by hand in the motherboard manufacturing process, not just installed through machines. Even today, it requires a great deal of machinery and skilled labor to manufacture a motherboard.

Image Credit: GamersNexus’ Gigabyte Factory tour video — shows a “Function” box that rapidly tests motherboards with pre-mounted components.
Once the motherboard moves off the assembly line, it needs to be thoroughly tested by workers on the floor before it ever leaves the factory.
Motherboards that pass these tests are packaged in anti-static bags to prevent electro-static discharge (ESD) before moving on to padding, boxing, and shipping.
Those are the basics of motherboard manufacturing.
If you want to see every step of the manufacturing process for yourself, I highly recommend the GamersNexus video below. It’s fairly recent and goes into great detail about the processes involved.
FAQ
How do I tell if a motherboard has Wi-Fi?
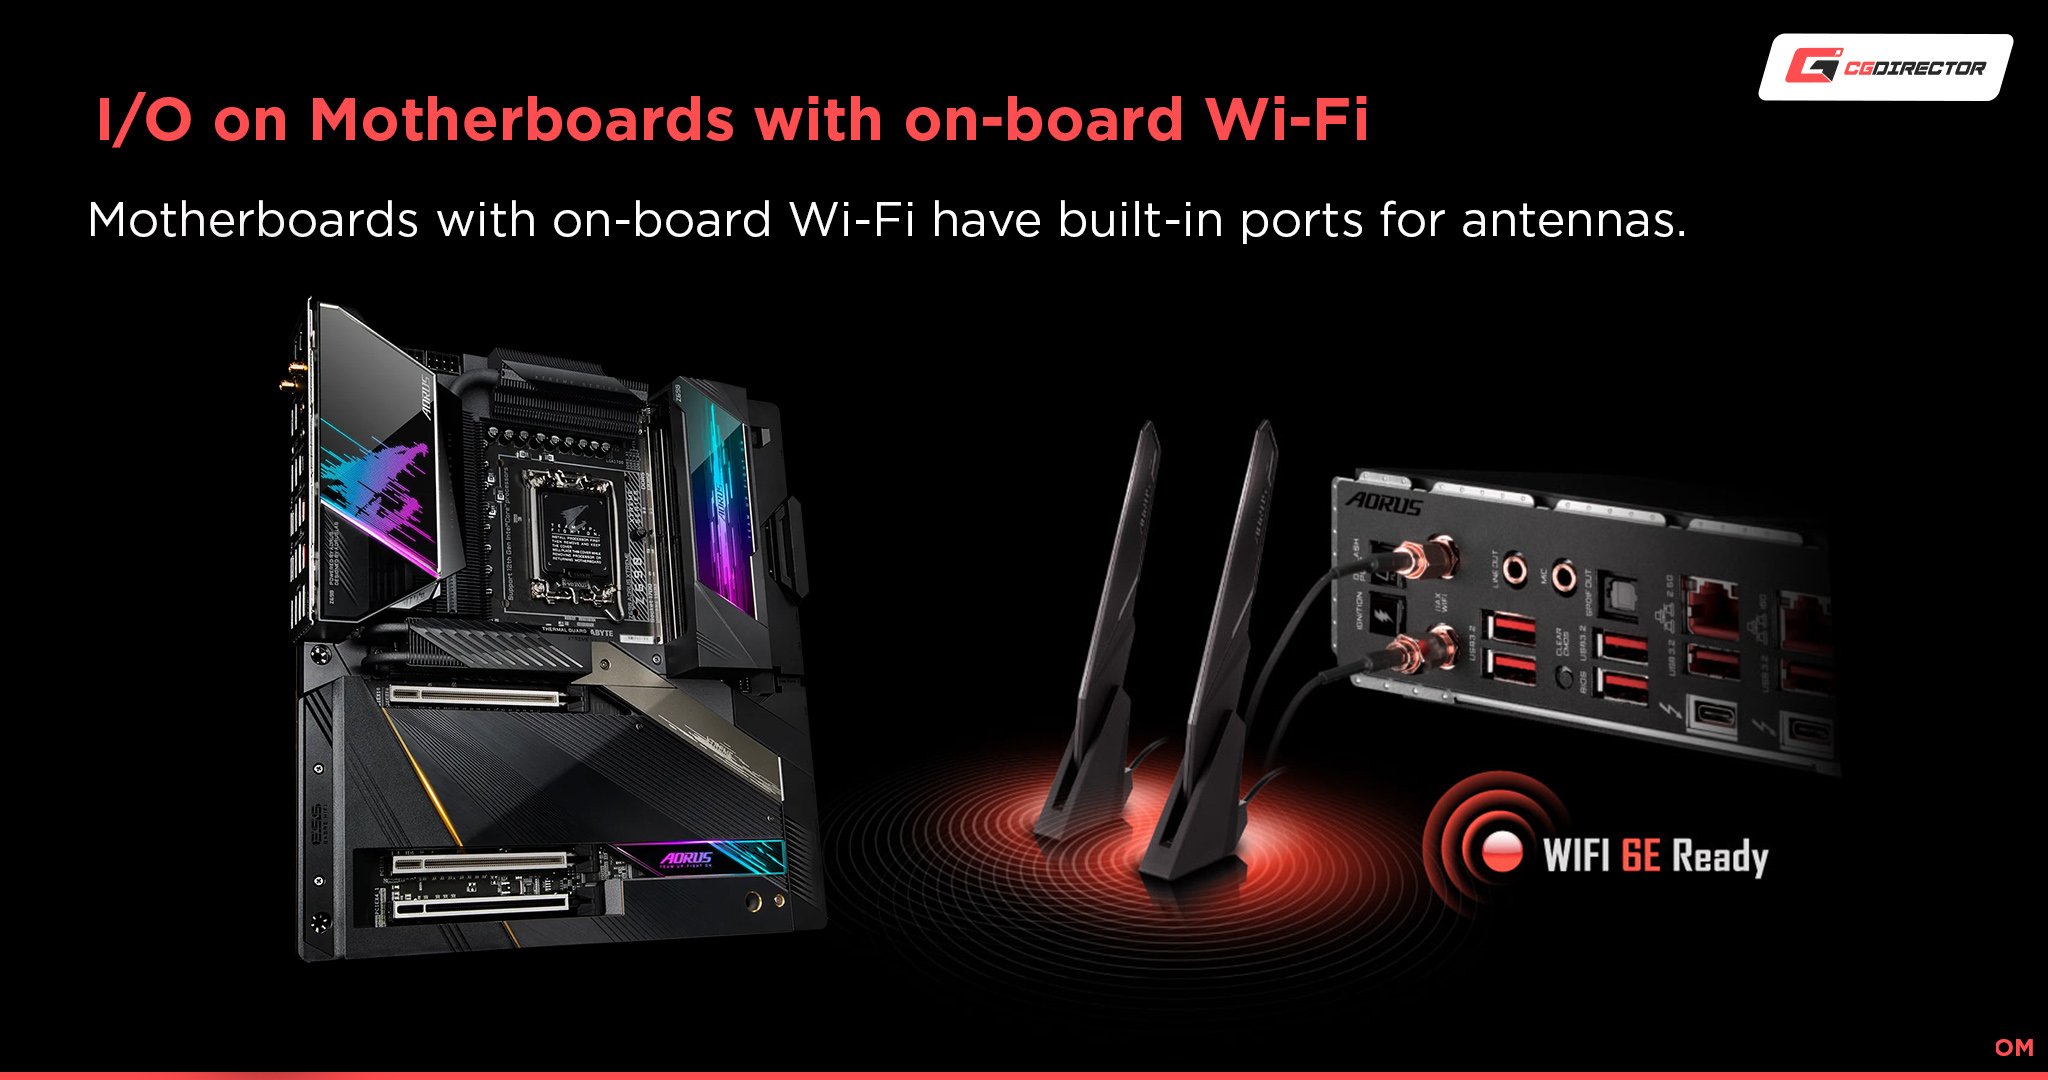
Fortunately, it’s usually pretty easy to tell if your motherboard has Wi-Fi. The most obvious tell will be the presence of ports where you can connect an antenna on the rear I/O.
Source: GIGABYTE
However, you may also want to take a closer look at your onboard Wi-Fi specifications to ensure that you have an up-to-date standard!
If you’re concerned that your motherboard doesn’t have Wi-Fi or an up-to-date standard, you may also want to check out Alex’s roundup of The Best Wi-Fi Cards.
How does a motherboard impact my PC’s performance?
So, how does a motherboard impact your PC’s performance?
Immensely, actually.
The motherboard might be the most important component in your system because it determines compatibility with every other component in your system and is, in fact, responsible for making them all work together properly.
If you’ve been following the article up to now, you may even know what specific parts of the motherboard are most responsible for your performance.
For example, did you know that overclocking capability has to be enabled by a chipset?
Even though all modern AMD CPUs and certain Intel CPUs can be overclocked, you won’t be overclocking those processors without the correct Chipset enabling the feature on your motherboard.
In Intel’s case, only one chipset does this for consumers in a given generation (as of writing in mid-2022), and it will be the most expensive for that series of CPUs.
For more on this and other motherboard-related bottlenecks you may encounter, consider Alex’s detailed Guide to How Motherboards Impact Performance.
What temperatures are safe for a motherboard?
If you’ve ever worried about system temperatures, especially for your CPU or GPU, you may also have worried about motherboard temperatures.
In fact, most temperature reading guides will include thermal readings from the motherboard, not just your core performance components.
You can click here for a more detailed guide to motherboard temperatures and controlling them if you like, but don’t worry too much about your motherboard overheating.
Your CPU or GPU, the actual sources of heat inside your PC besides your PSU, are the components you generally want to stop from overheating.
You’ll generally want to monitor your system temperatures whenever you can, especially when you notice something is wrong due to intermittent crashes or slowdowns.
Think of these as ways for your PC to tell you something is wrong.
If you need an application to monitor your temperatures, we recommend using HWInfo.
Over to You
And that’s it, at least for now!
I hope that this article helped you learn what motherboards are made of and at least gave you a decent idea of how it all gets put together.
If you have any other motherboard or PC hardware-related questions, please feel free to leave them in the comments section or the forums!
Until then…stay hydrated. And keep that hydration away from your electronics, especially your motherboard. A lot goes into making those things, it turns out.
![What Are Motherboards Made Of? [Main Components & Manufacturing] What Are Motherboards Made Of? [Main Components & Manufacturing]](jpg/what-are-motherboards-made-of-1200x675.jpg)
![Where Do You Connect PC Fan PWM Cables To? [Beginner’s Guide] Where Do You Connect PC Fan PWM Cables To? [Beginner’s Guide]](jpg/where-do-pwm-cables-go-beginners-guide-twitter-1-594x335.jpg)
![How To Connect Front Panel Cables To Your Motherboard [Guide] How To Connect Front Panel Cables To Your Motherboard [Guide]](jpg/how-to-connect-front-panel-cables-to-your-motherboard-twitter-copy-1-594x335.jpg)

0 Comments